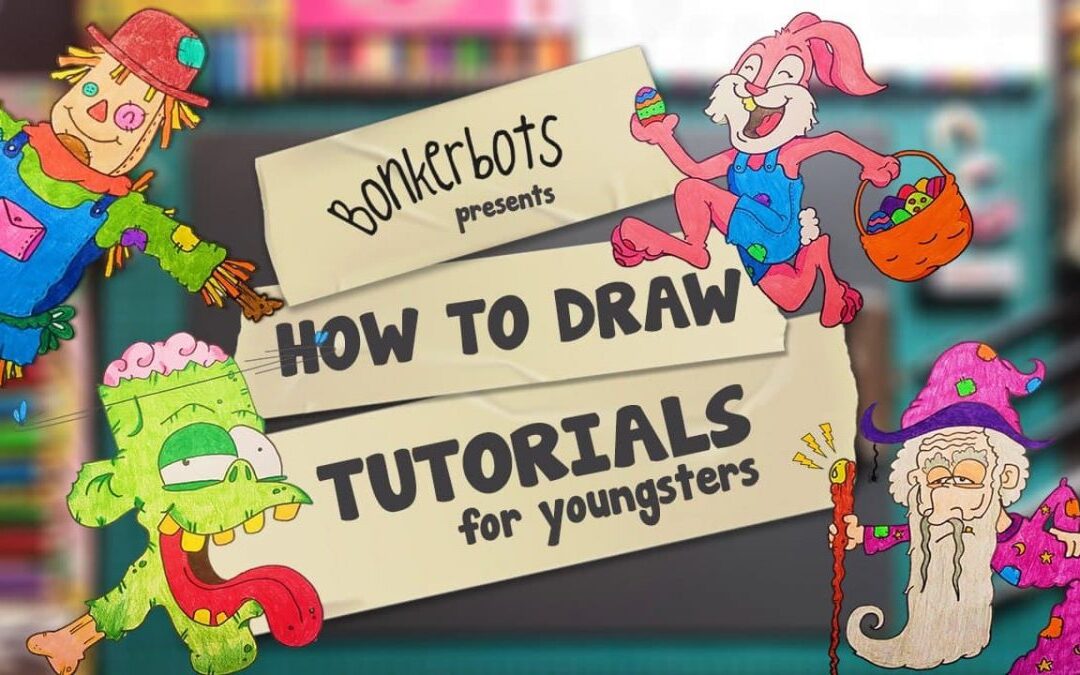
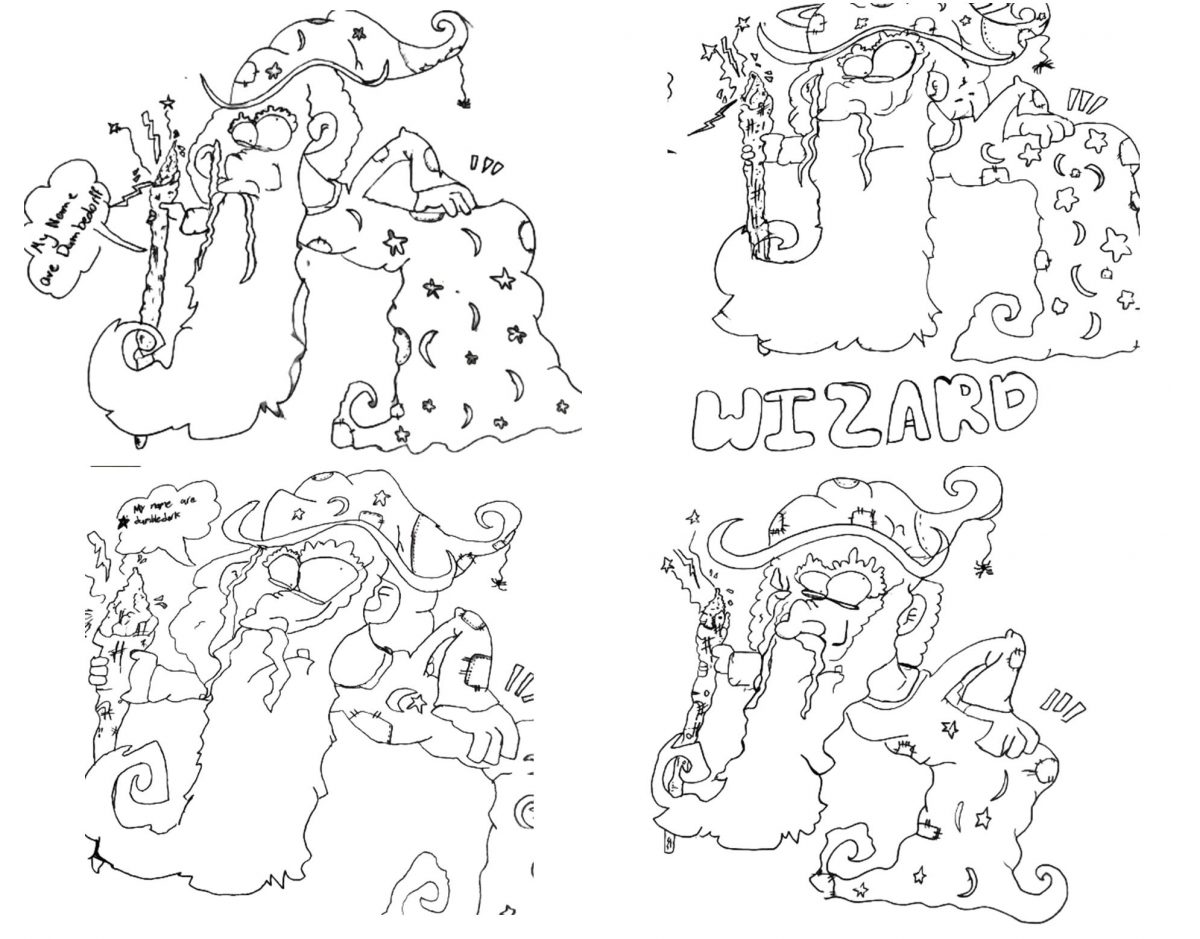
Bonkerbots on YouTube. Wow! We never thought we would end up having a Youtube channel. Granted we’re still bran new and have a teeny tiny following but that was never the reason for us creating one. As you know, Keith has this pretty awesome gift of being a rather talented artist. I’ll request an image and minutes later he has created one that’s way better than what I had originally described. I love his gift and wish that I could even begin to draw a tiny bit like him. Yes, yes we all have our talents and mine lie else where, which is how we landed up creating our channel.
I mentioned “You should start doing some tutorials” and TA DA! It has been absolutely wonderful creating these videos. As a teacher, I have always enjoyed doing directed drawings with my students and not just for Kindergarten but for all ages. One thing can be said for all of them and it’s that they LOVE IT! It cannot be said enough but Art is insanely important. From my experience teaching in Thailand and Cambodia, the Arts aren’t seen as important. There is a ton of focus on your core subjects and that’s totally fine. Whether I’m planning my own lessons or subbing, I’ll always throw in some Art. It’s quite funny though because I’ve created a little bit of a reputation by walking in a sub class and the kids will go, “Yay, we’re doing Art today! 🙂 ) so naturally, I cannot disappoint their sweet faces.
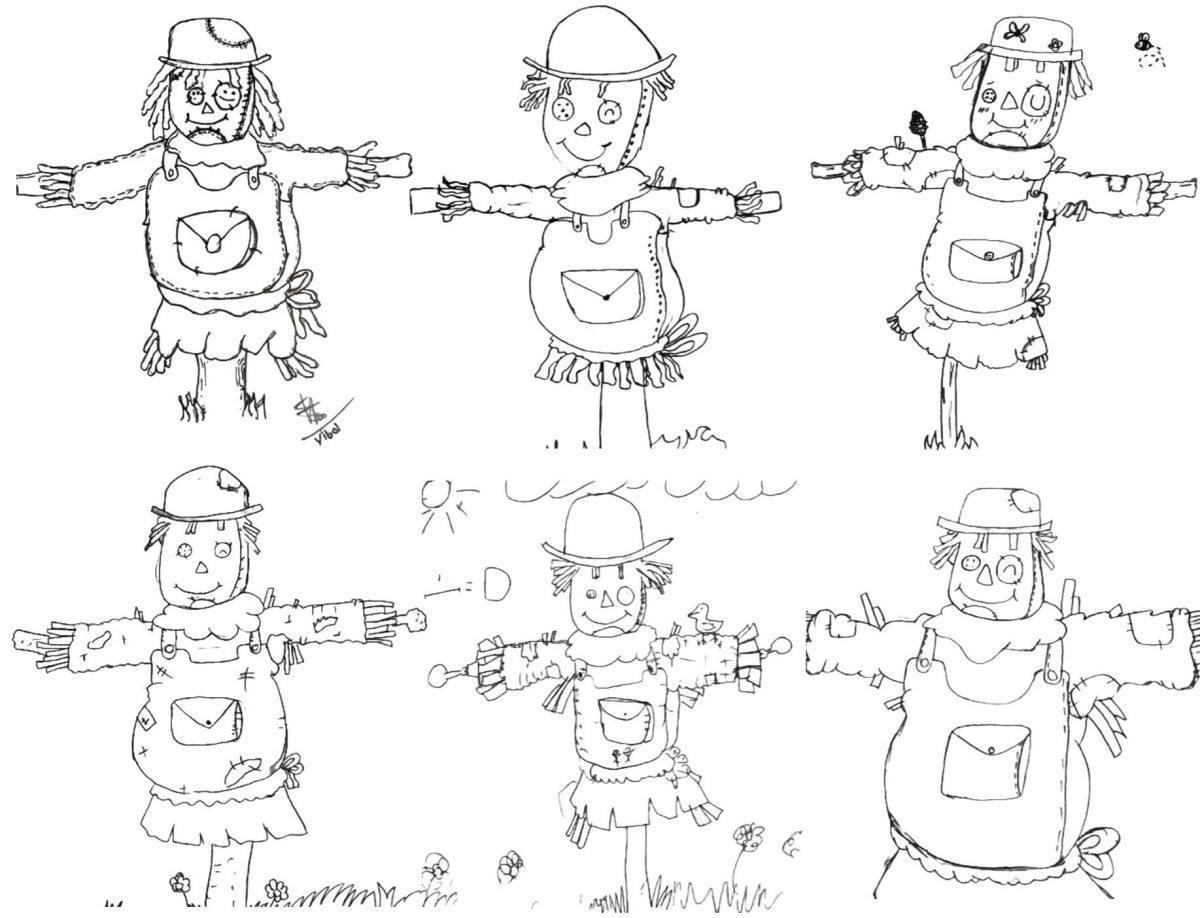
Some Scarecrows drawn by my Grade 6 students.
Our channel is designed to help young students better develop their drawing, creativity and line work accuracy. The videos can be done by young students or even adults. I have followed all of the tutorials and have really enjoyed doing them. There’s a sense of pride that happens once completing your drawing. You’re looking at it in the beginning thinking , “There’s no way I can draw that!’ or “That’s too hard!” My students have certainly said that. However, once you’ve finished drawing, you’re like Hey, I did that. 🙂 I actually find them rather relaxing too.
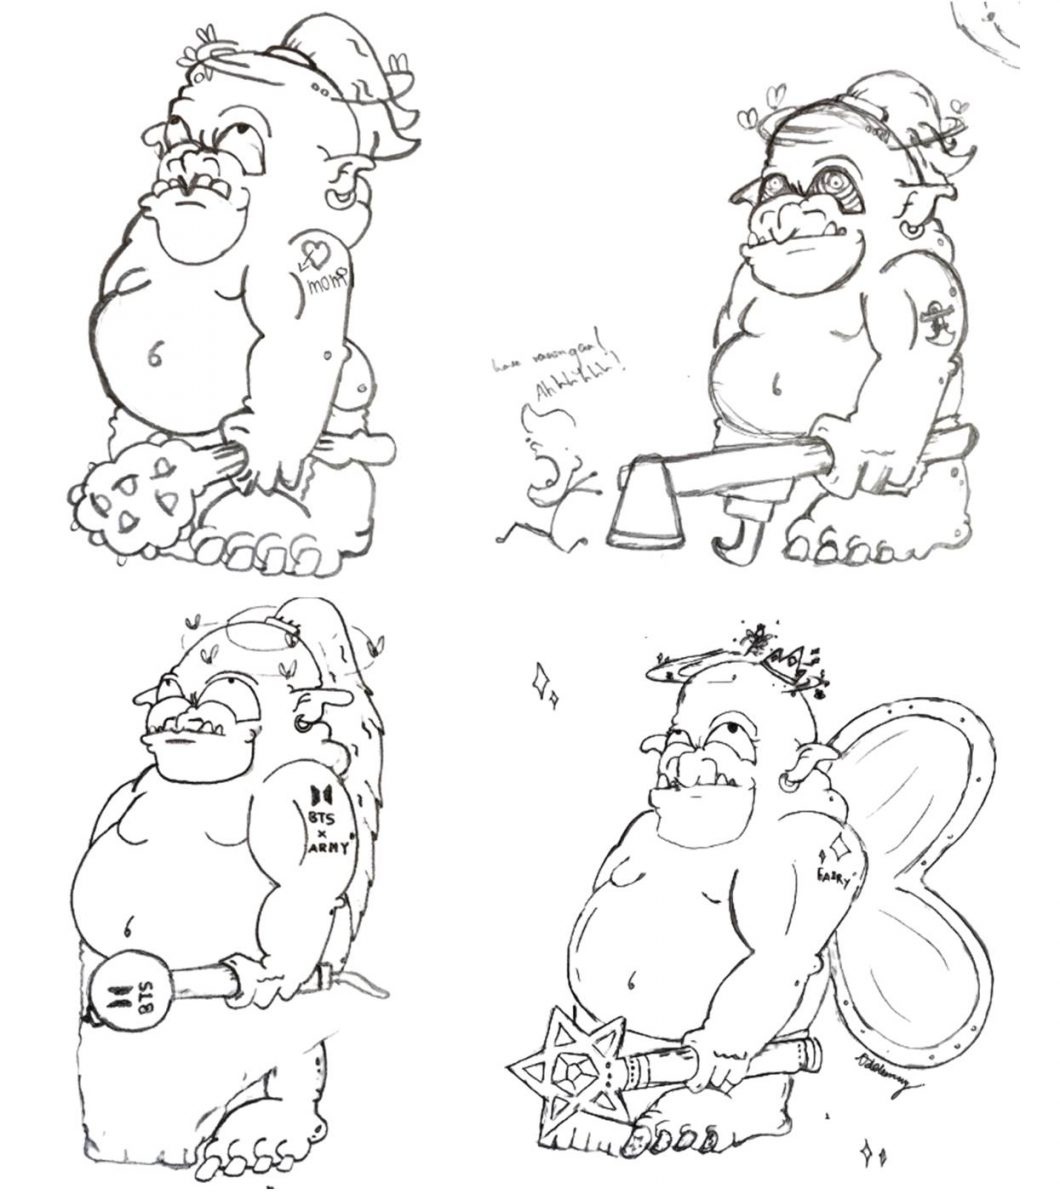
I love how my students personalized their Ogres.
There are plenty of tutorials online and so for ours, we chose to not have us speaking but rather just the text. You can play the video and pause if you need more time. It’s entirely up to you. The videos work for individuals, homeschooling or for a class fill of students. I’ve played them off a T.V and a projector, which all works perfectly.
These were drawn by Keith’s students. They look amazing!
So if you’re in the mood for drawing, please check out our YouTube channel. Give our drawings a go and tag us in them, wherever you are in the world. We would LOVE to see yours. 🙂 🙂
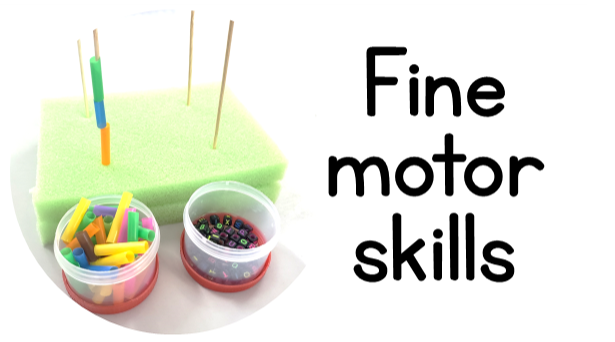
As Kinder teachers, we understand the importance of helping our students develop their fine motor skills. We’re constantly searching for new and exciting ideas to use in our classrooms. Pinterest certainly aids this and can become rather addictive. It can also become overwhelming at times, seeing all the amazing ideas that other teachers and parents are doing with their kids. Some are extremely clever, reusing materials that can be found around the house and others can end up being quite pricey. Regardless, they all help in developing motor skills.
Today I’m sharing the activities we used during our stations this week. These were all budget friendly as it consists of goodies that we already had and what we didn’t have was easy and affordable to get.
Let’s dive straight in.
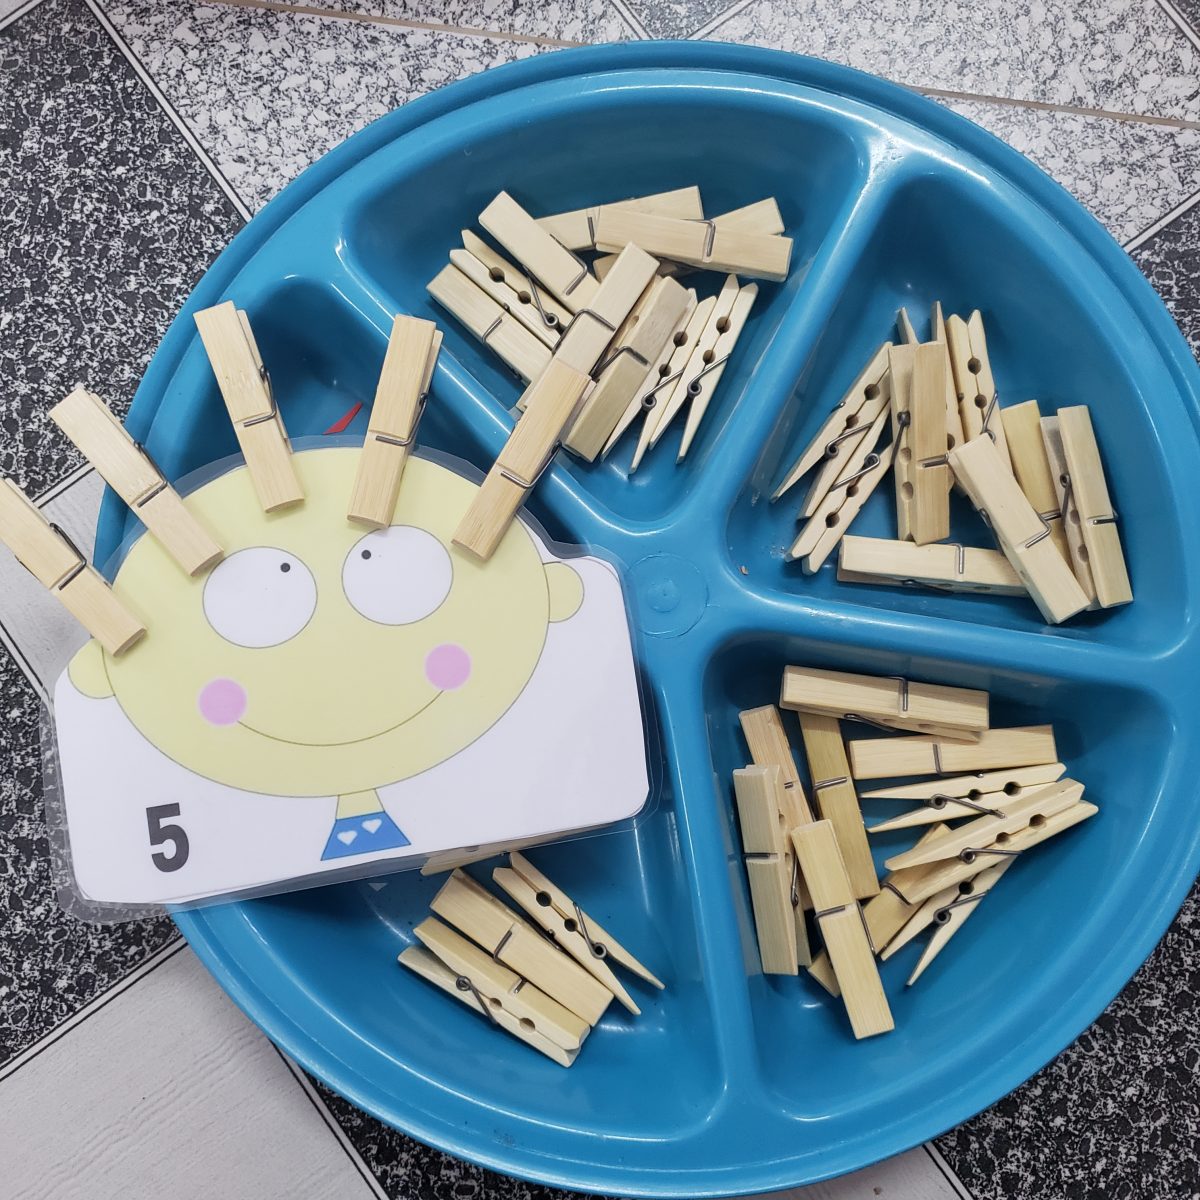
Peg hair
I was super chuffed to find these wooden pegs for next to nothing. They are normally quite pricey in Cambodia, or they certainly used to be, so that was quite a score. I bought a mixture of pegs, which the little ones all handled with ease.
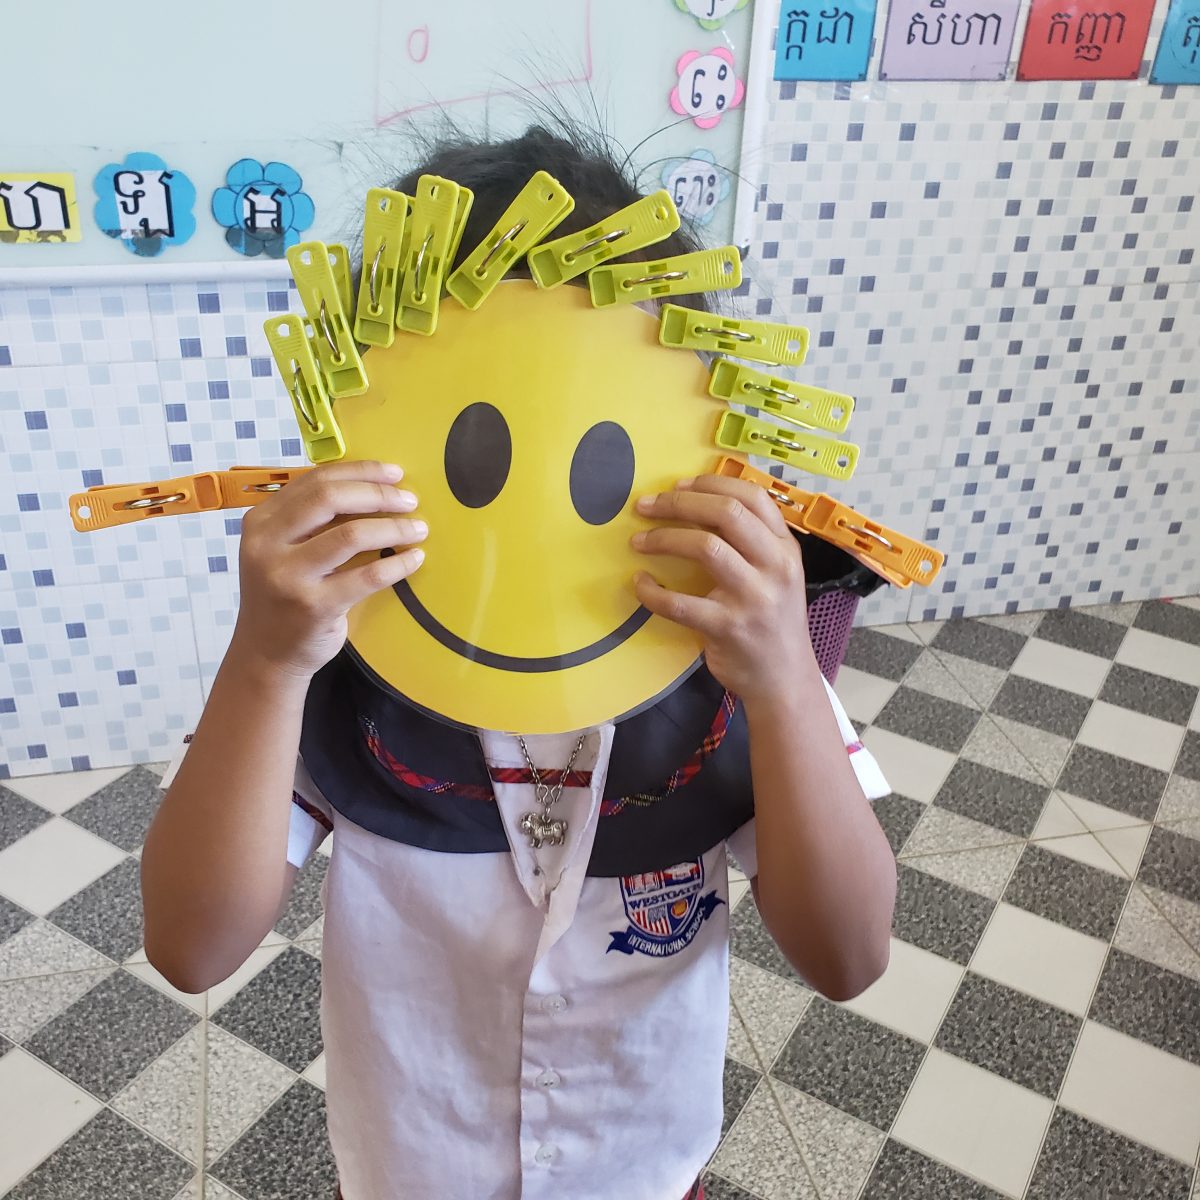
Pegs can be used in so many ways, but for today I just wanted them to practice clipping them onto the happy faces and I included the counting cards because why not? Unfortunately I cannot find the link to the site I downloaded the pics from but it is easy to make your own.
They were so excited to present their happy faces. Kids are great aren’t they? 🙂
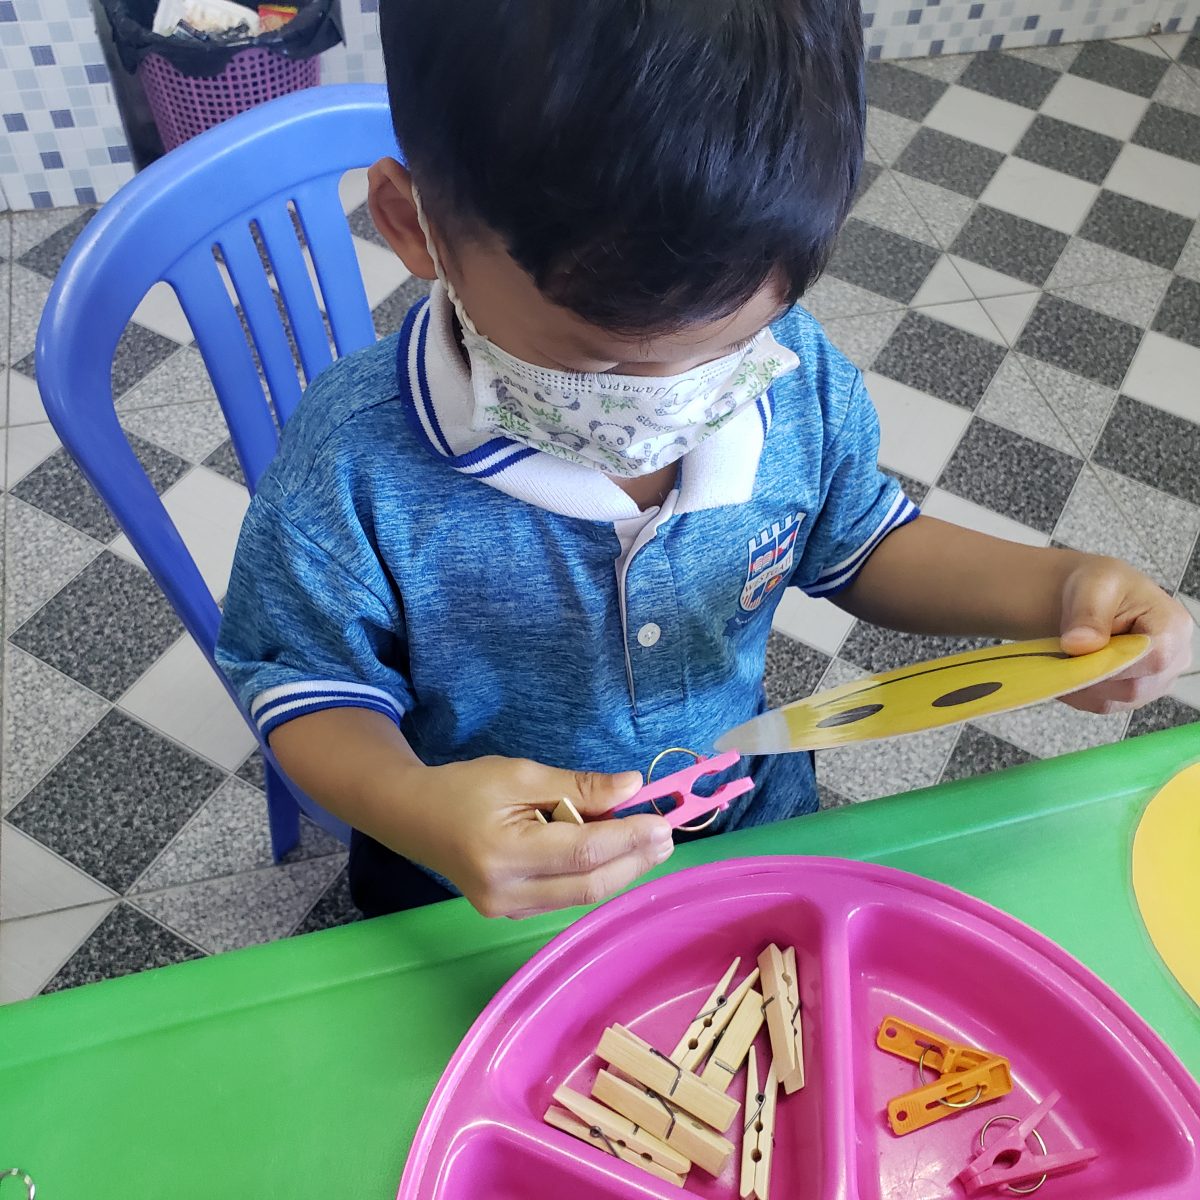
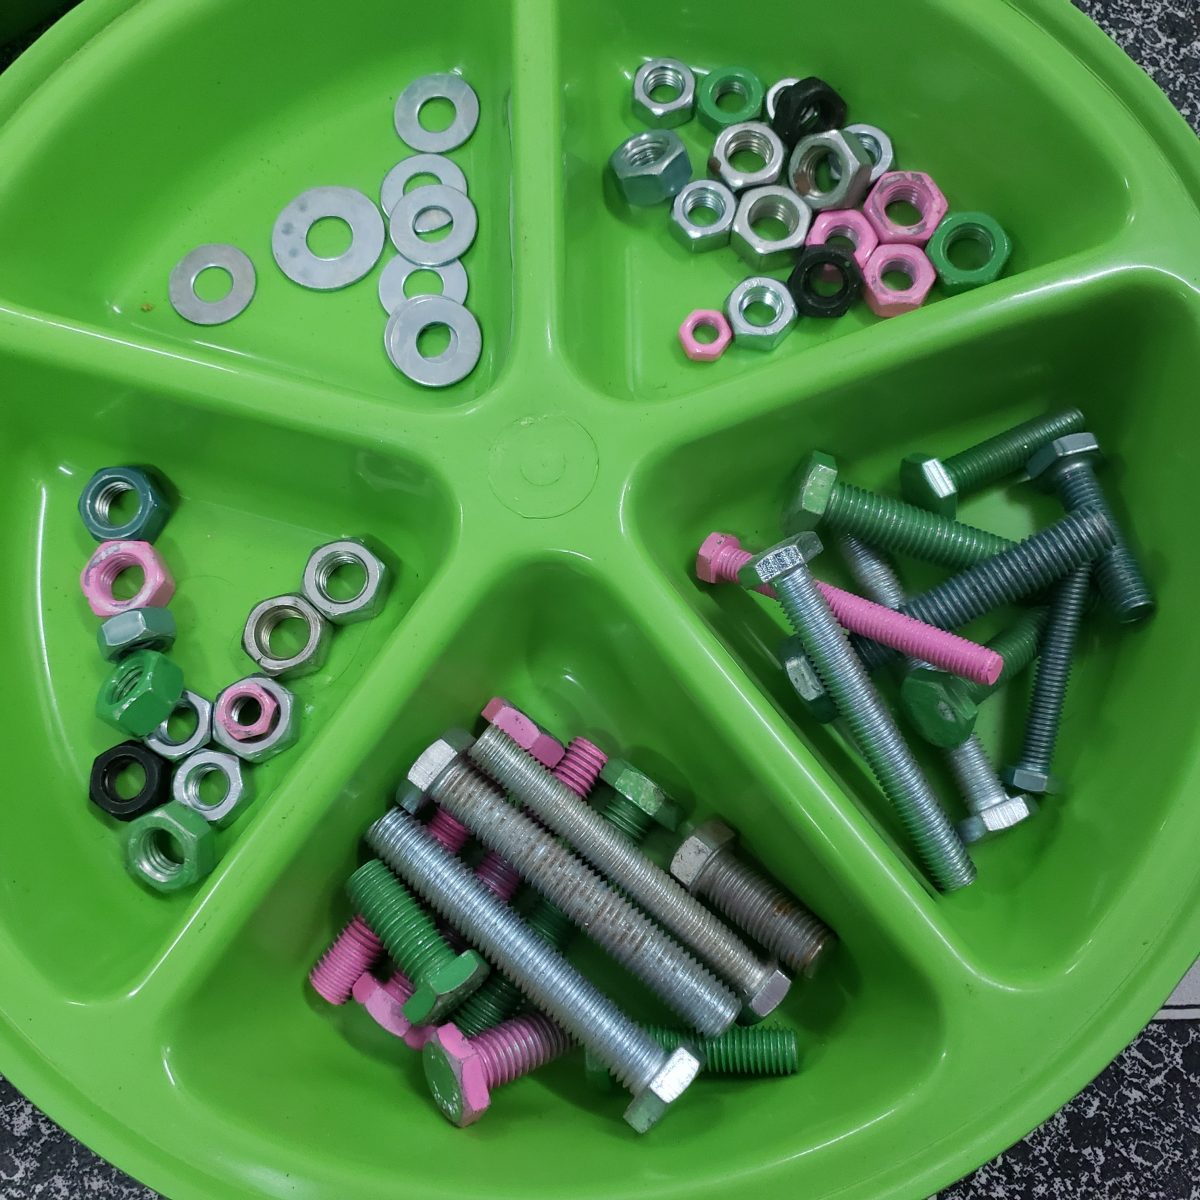
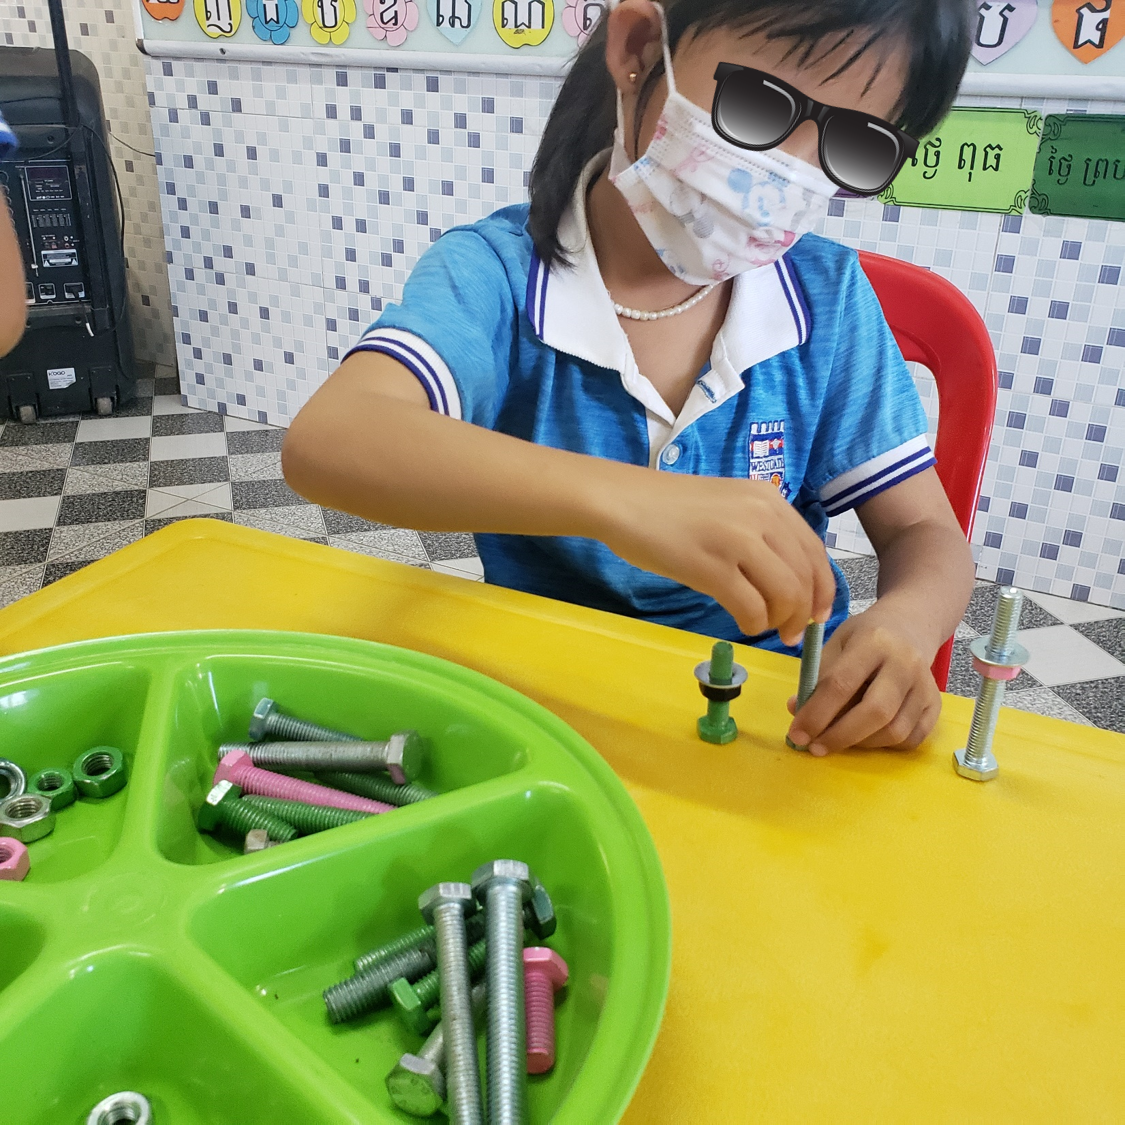
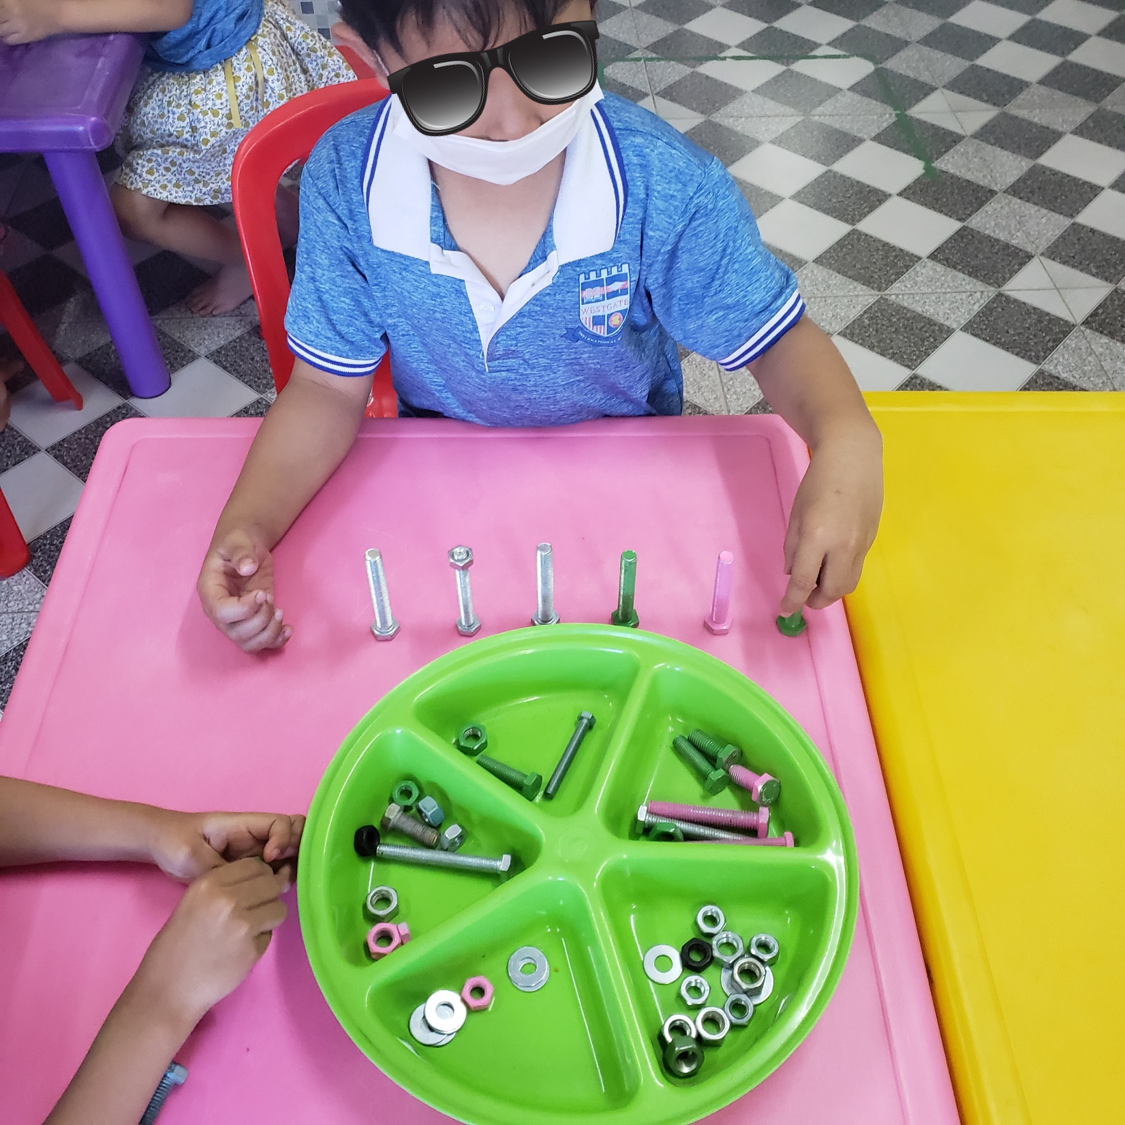
Nuts and bolts
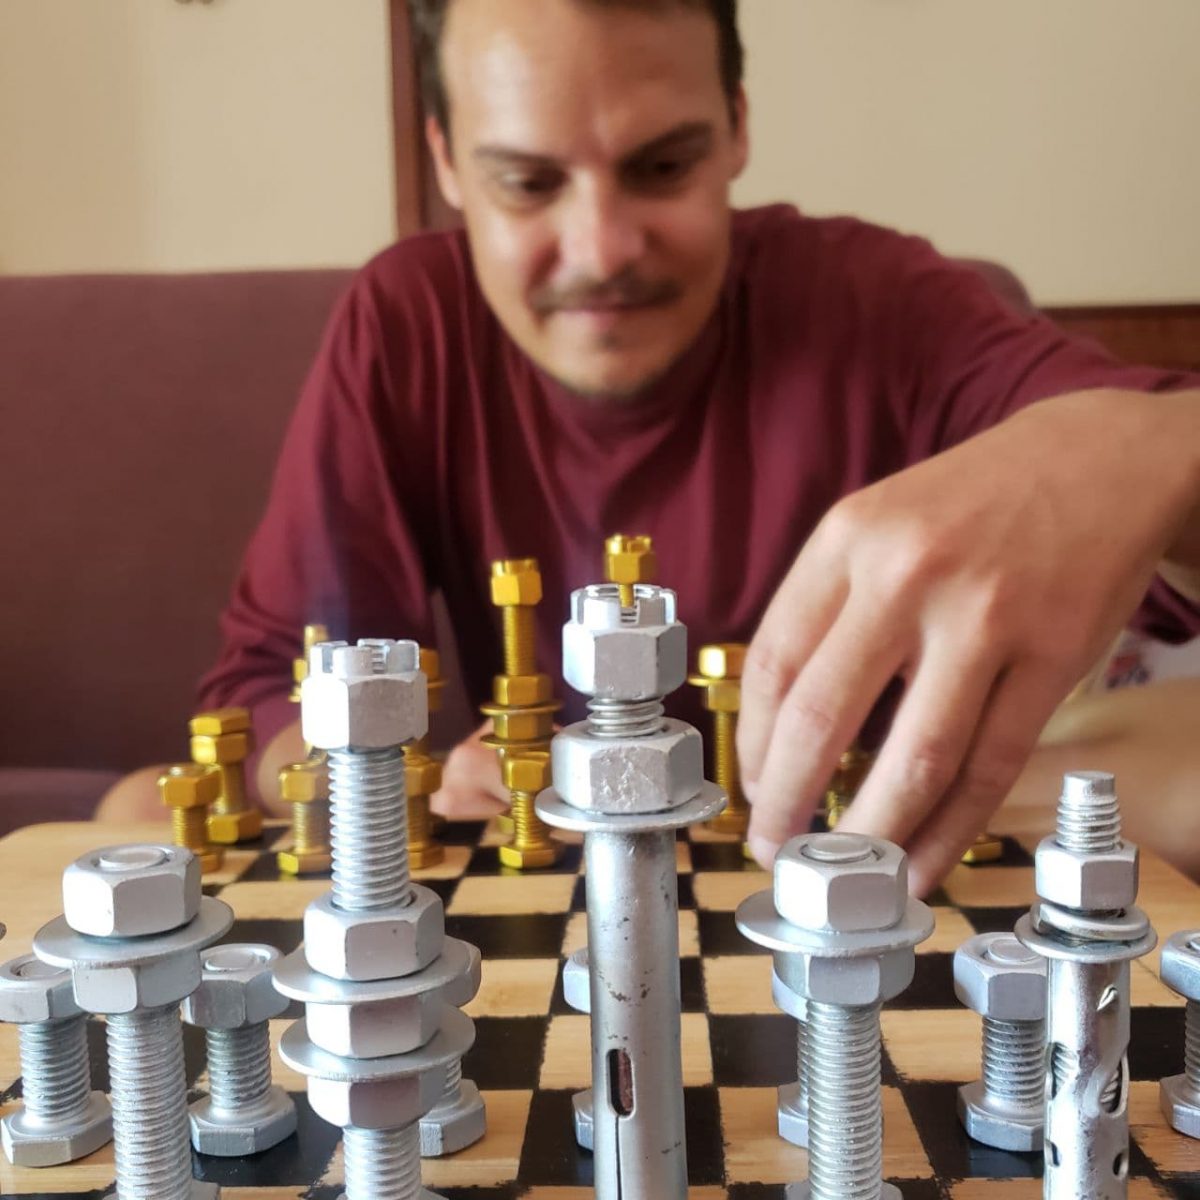
Now this may be because I recently made the chess set but this is something I have wanted to do with the kids for a long time but just never got round to it. Finally I popped on over to the hardware store AGAIN and purchased some nuts, bolts and washers. I sprayed some green and pink to add some variety and that was all the prep needed.
They all thoroughly enjoyed this activity, girls and boys had a whirl of a time.
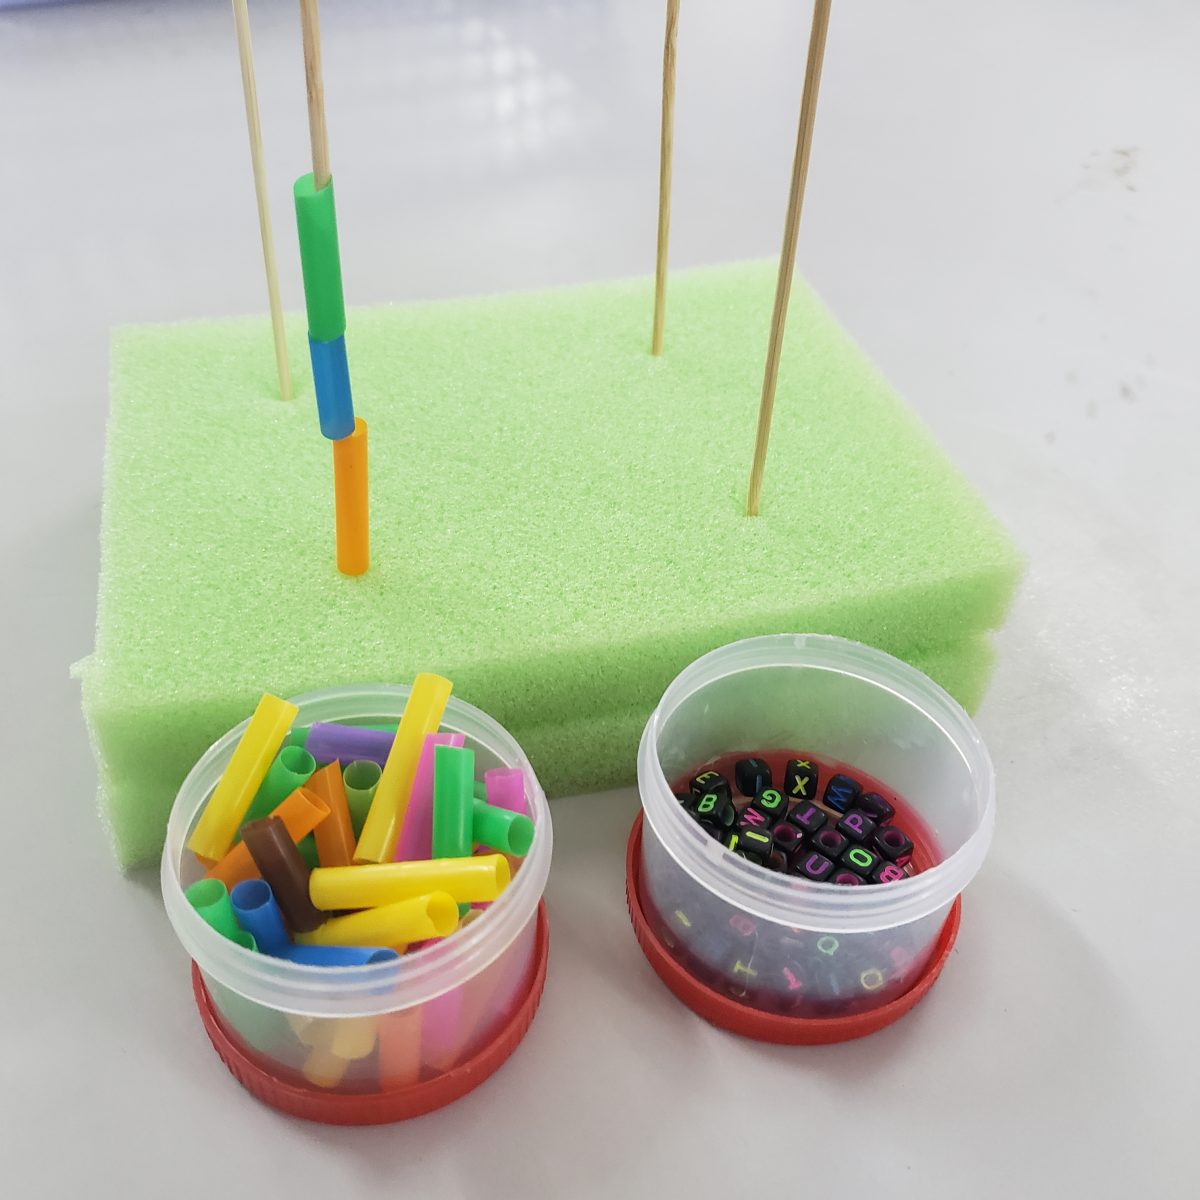
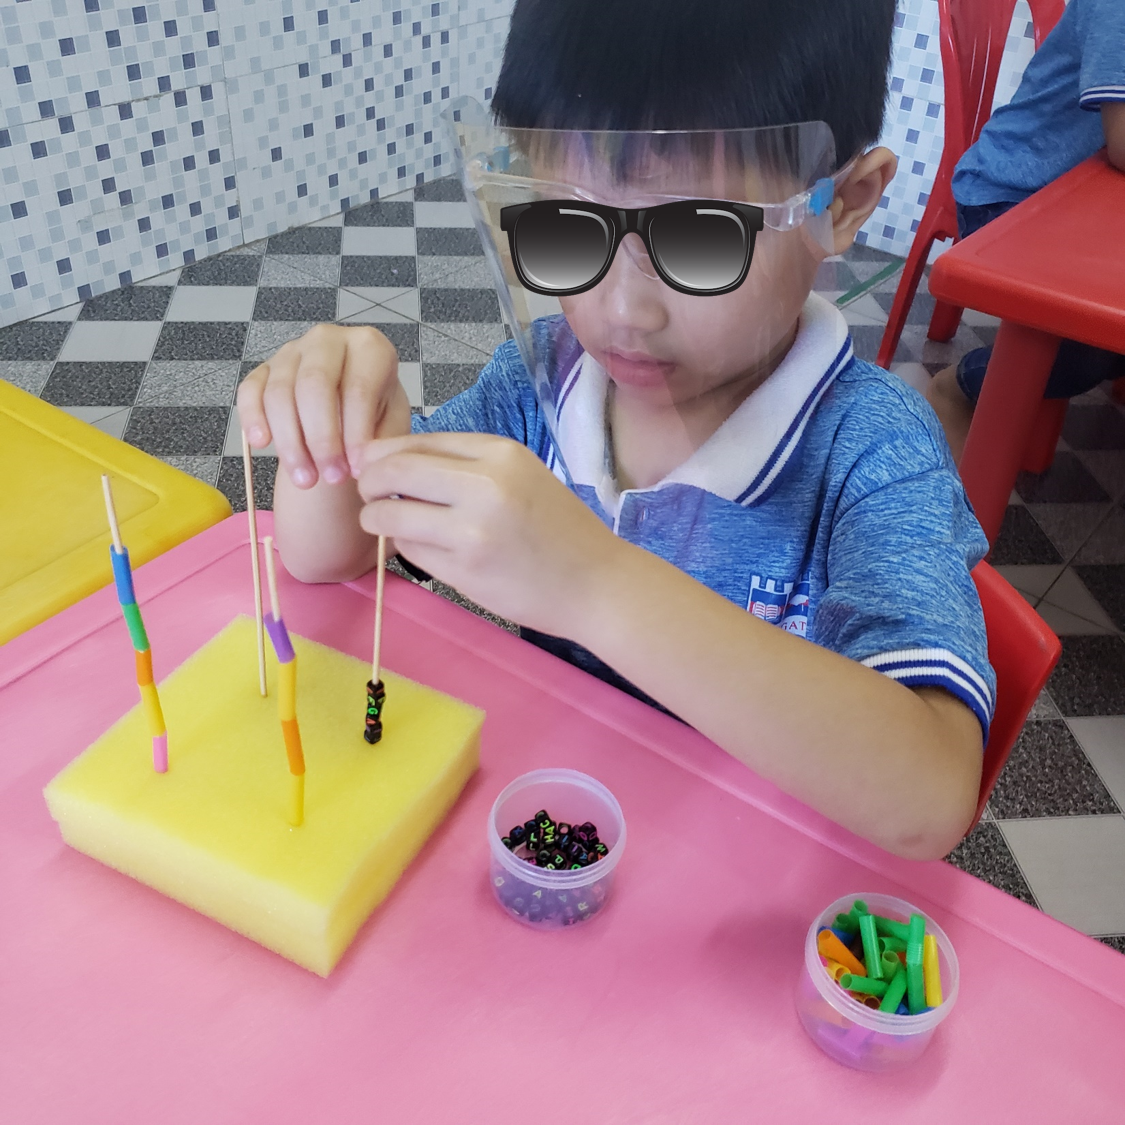
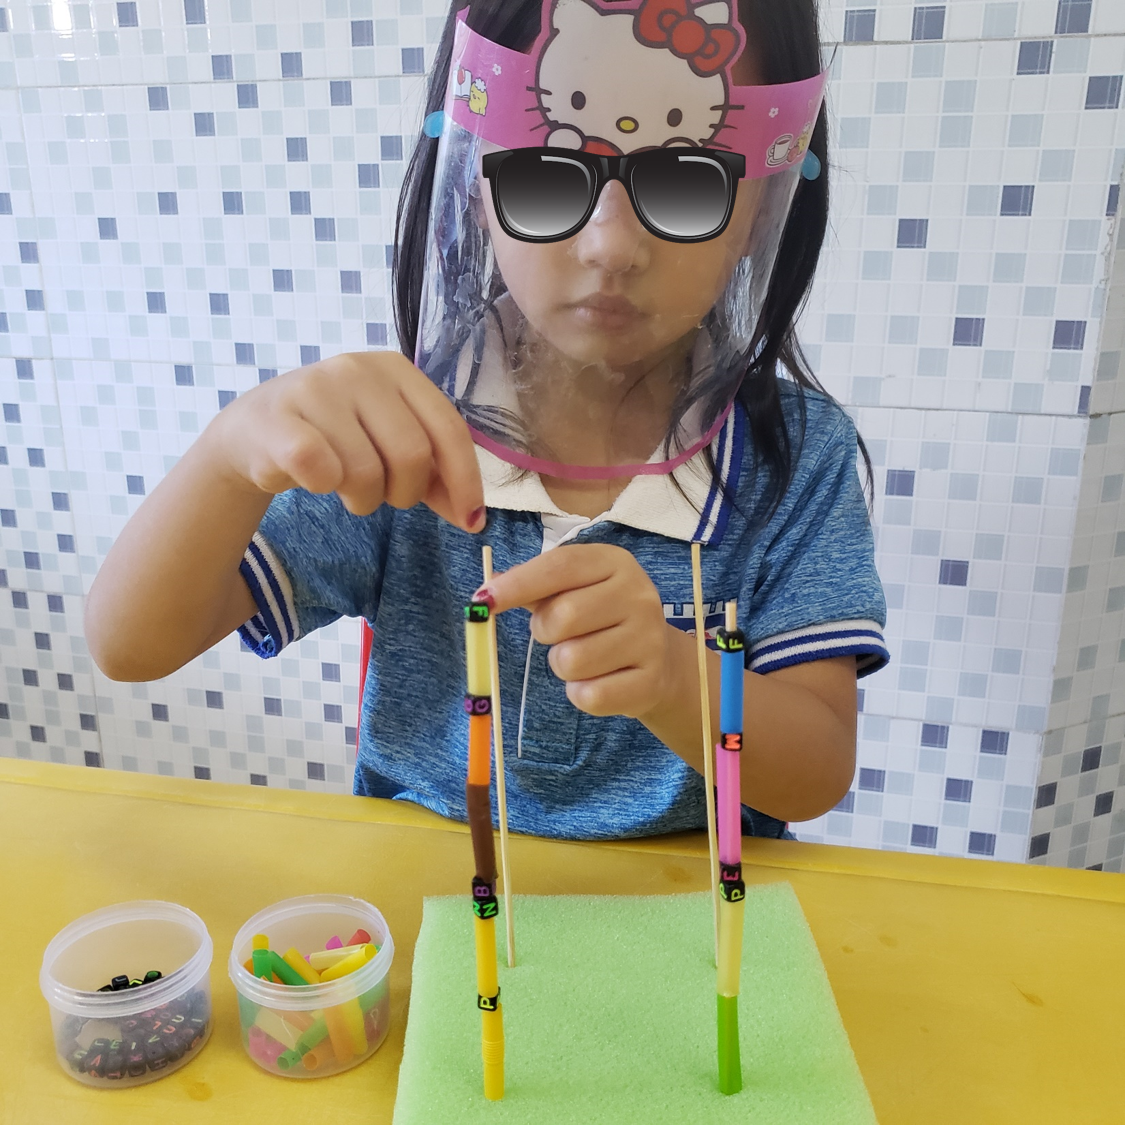
Beads, sticks and sponges?
This is another easy activity to put together and super affordable. The sponges cost less than 50c, which I cut in half. The sticks were also 50c for a pack of 100 and I used straws and small beads to make it more challenging for early finishers, and that’s it.
I simply placed two pieces of sponge on top of each other, pushed four sticks through, arranged some straws and beads in little containers, and the station was ready for action. This was a real hit as they were completely zoned throughout. For those speedier than others, I added another stick or two and that kept them busy. What a hoot!
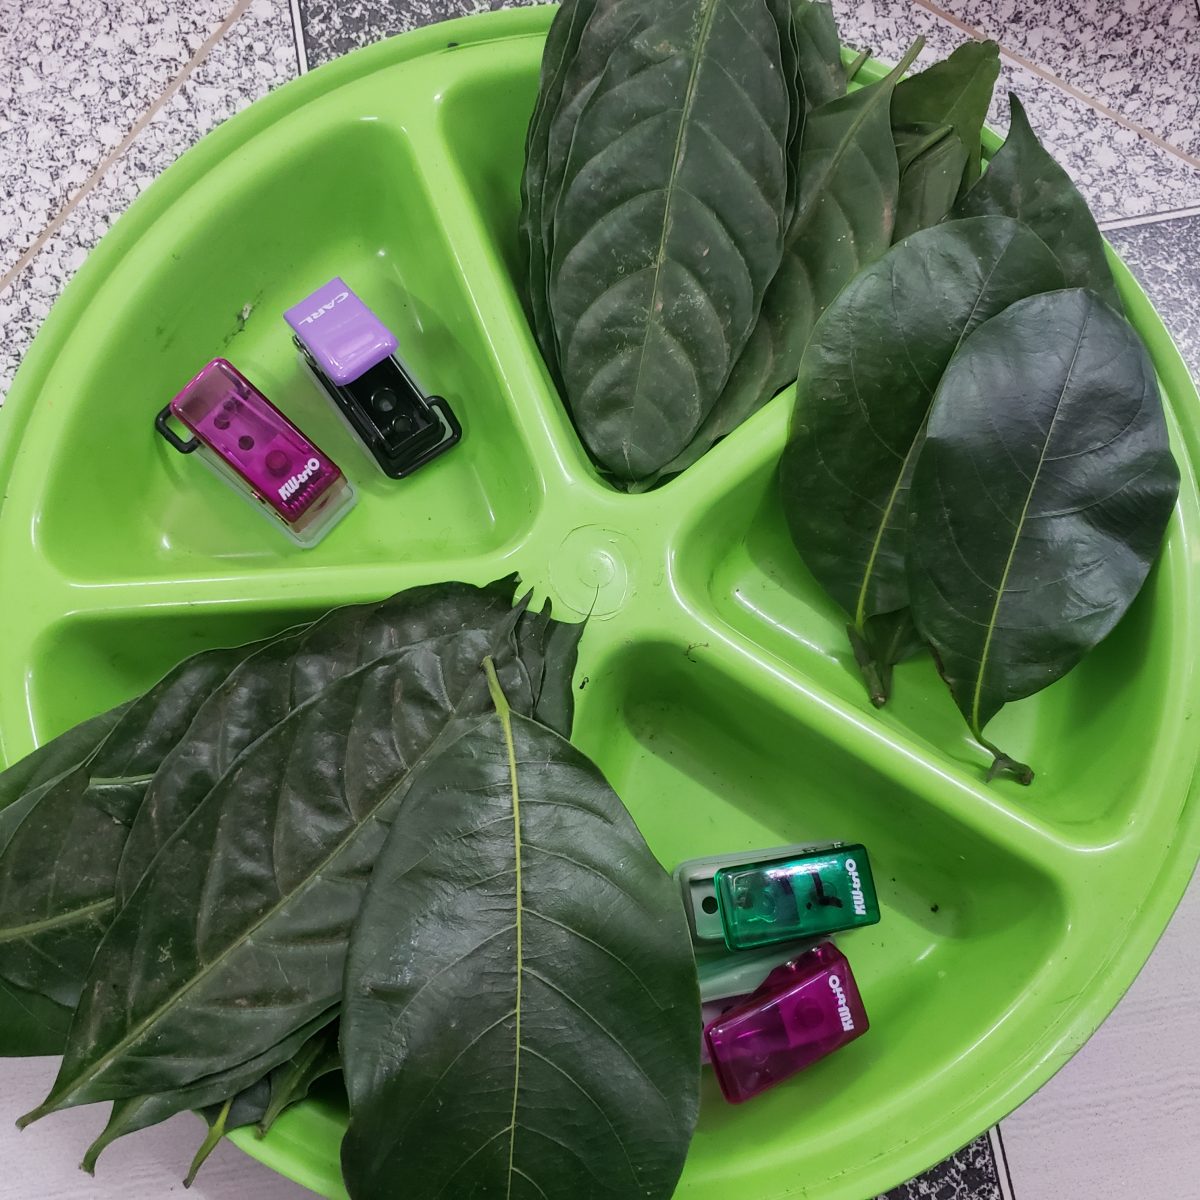
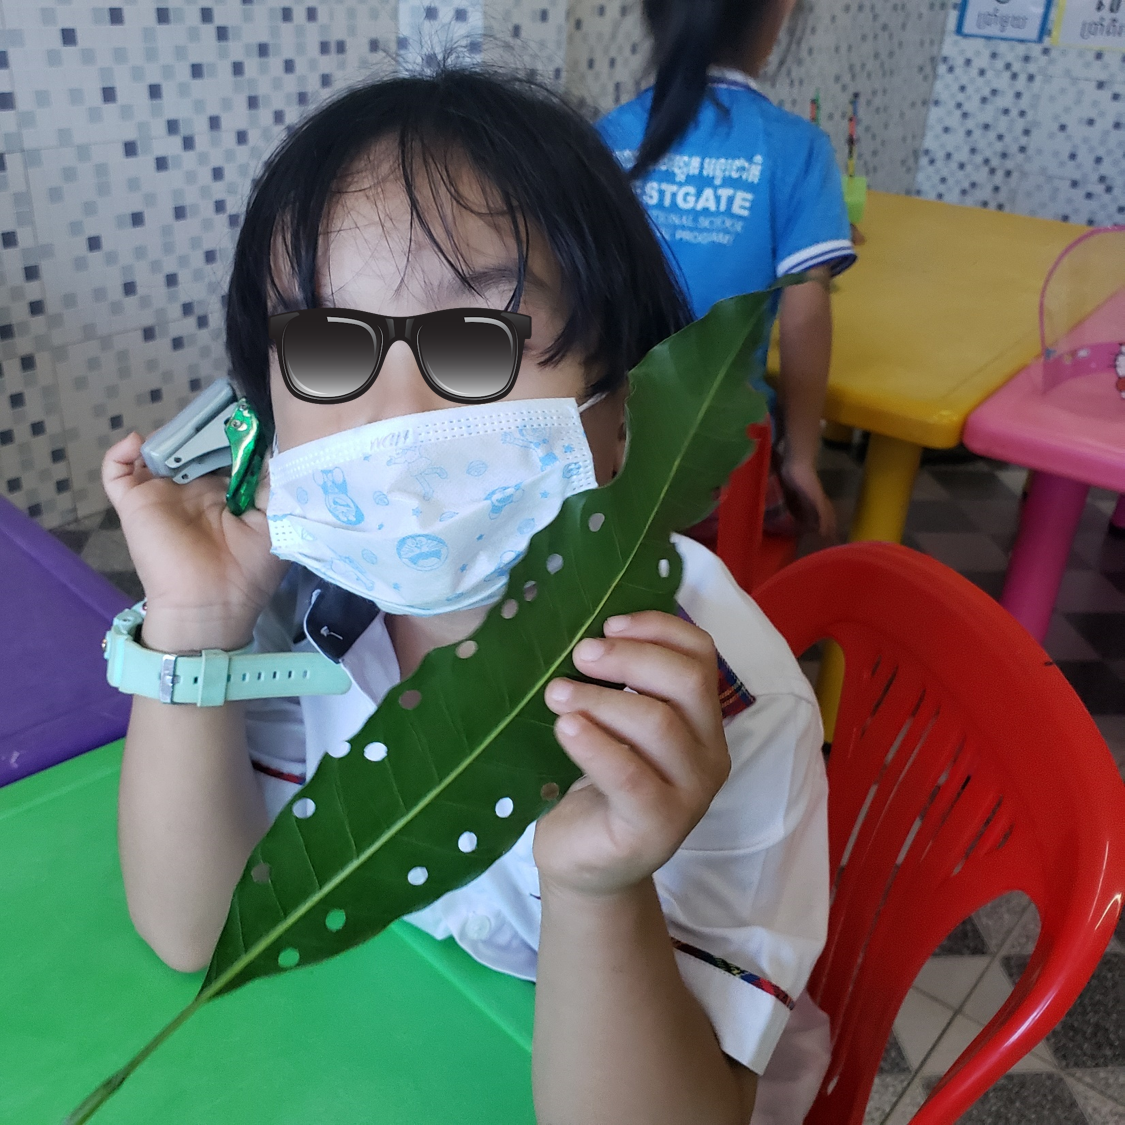
Leaf punch
This station sounds funny but again, another simple activity to put together. All you need are some single-hole punches and leaves. I grabbed leaves from our mango trees, which was great as they’re big and found some smaller leaves off of our durian tree. That’s it. My students really enjoyed this, it’s a random activity but great for experimenting with different textures.
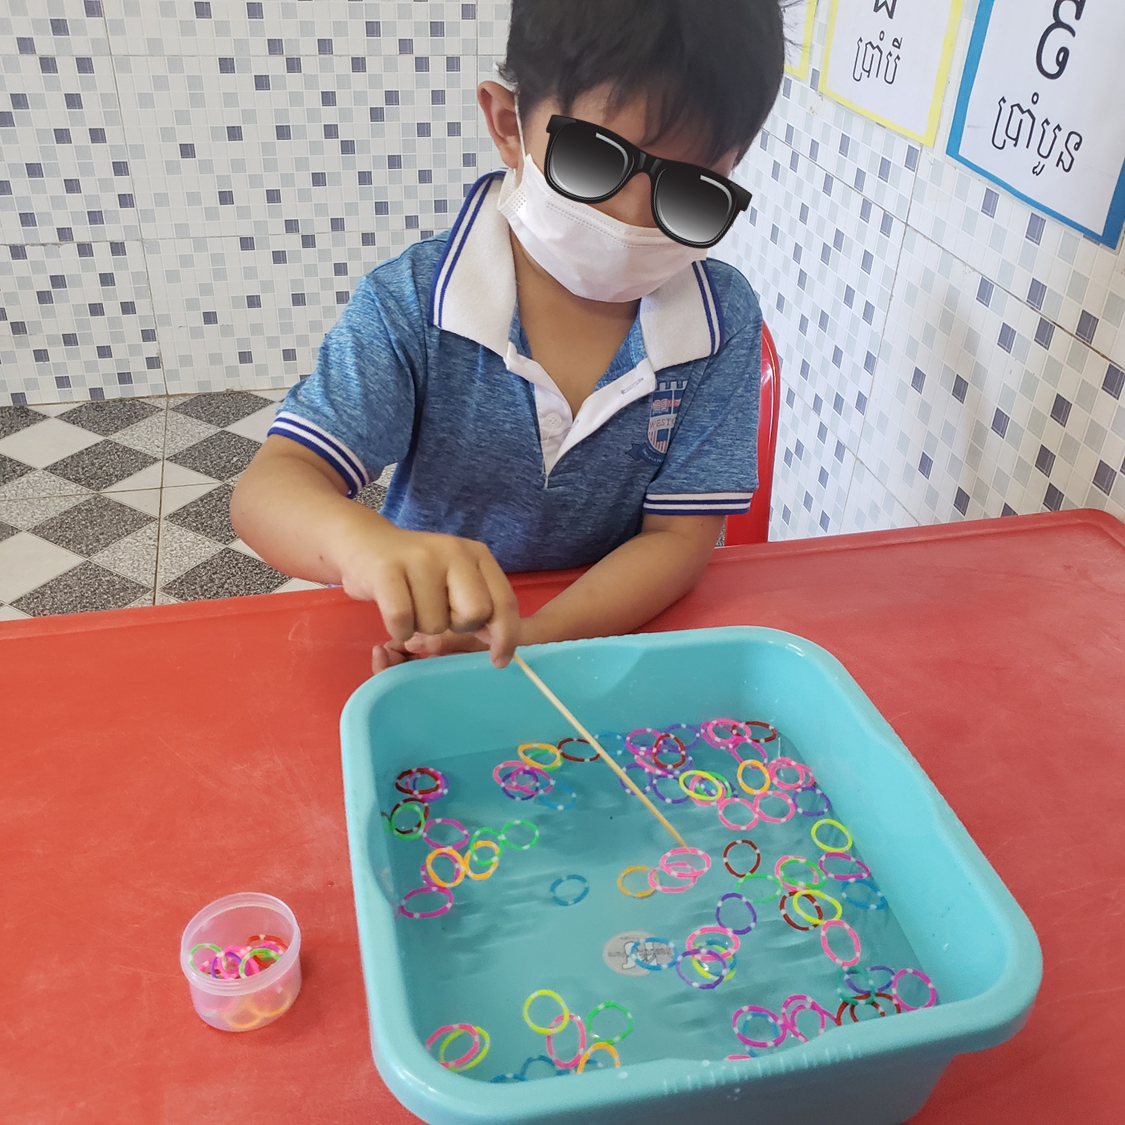
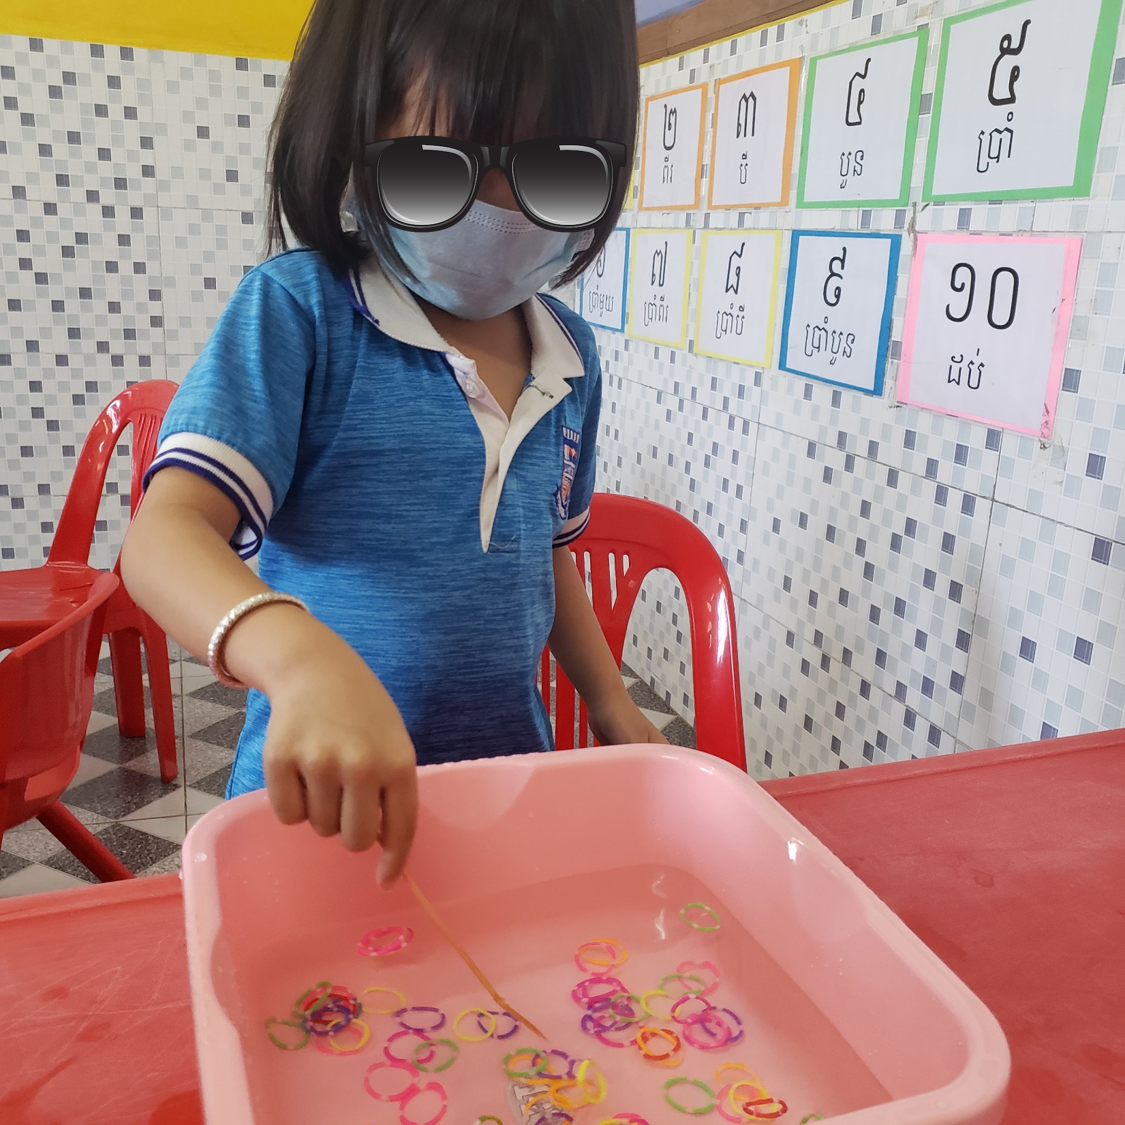
Fishing for elastics
This is exactly what the header entails. I used small containers to house the water (these were about a $1) added small, colorful elastic bands and gave the kiddies a stick (same sticks used earlier). They needed to fish for the elastics and place them into a small container. This was the favorite for the day, must be because of the water but they all absolutely LOVED it!
Well I hope that inspires you. I really love doing creative stations with my kids. They work for all ages and the kids benefit greatly from them.
Just like that. Christmas has come and gone. Crazy right? Well, I guess we can say that about this entire year. Keith and I normally don’t normally exchange gifts at Christmas but this year, we decided we should but…we should make each other something. We laid down some rules such as, we were not allowed to spend more than $20 and it had to be something we could use. Oh and Keith was banned from drawing anything, that would be a big disadvantage for me. 😉 Let the brainstorming begin.
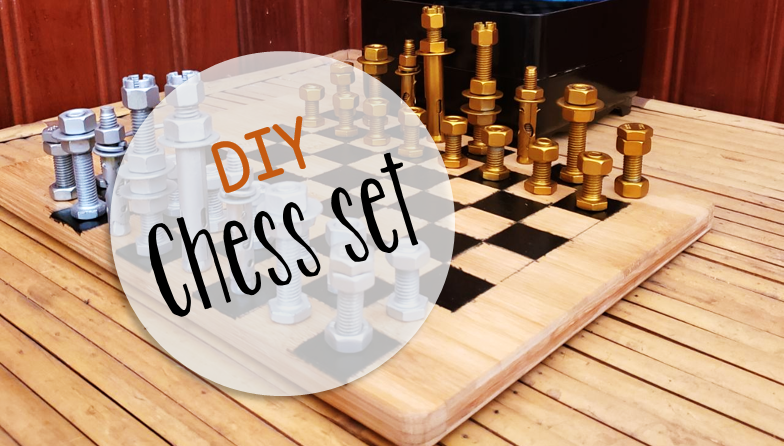
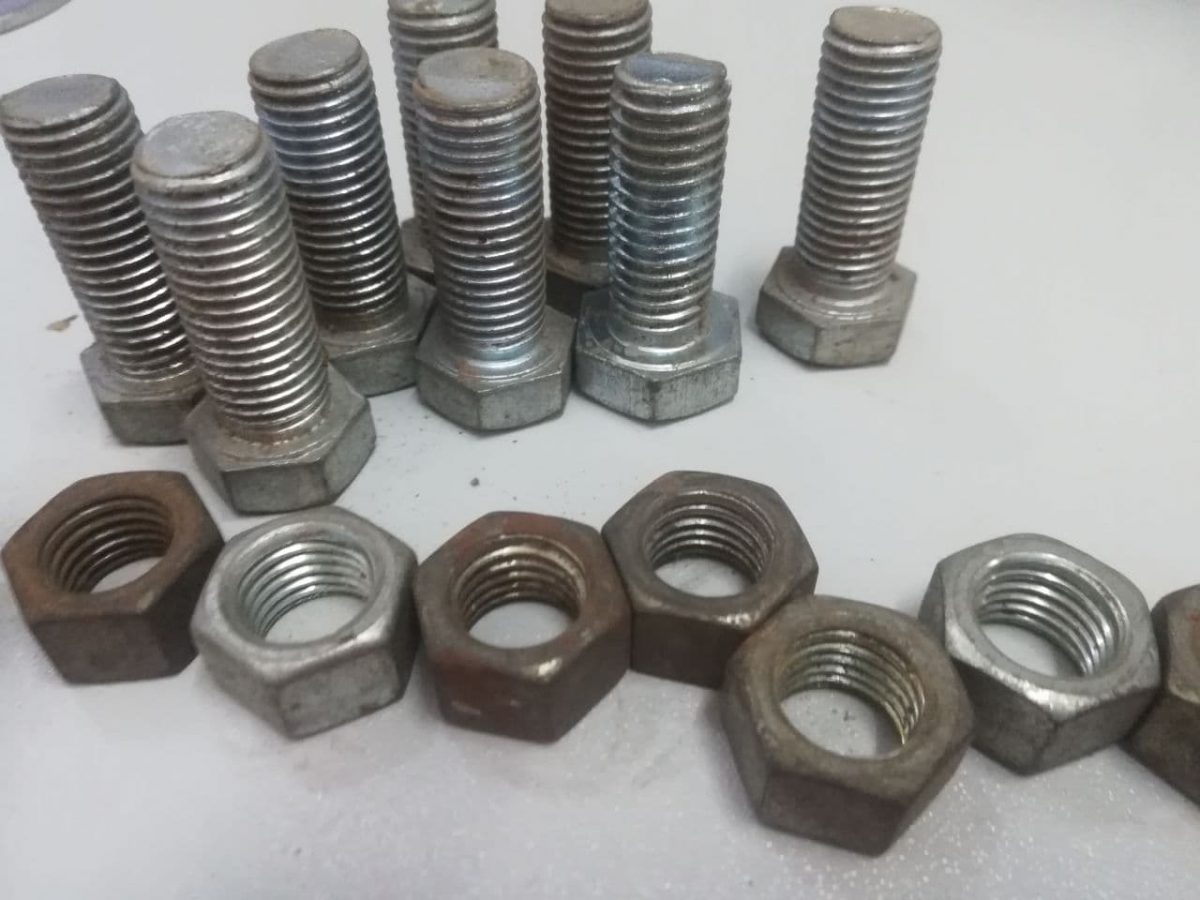
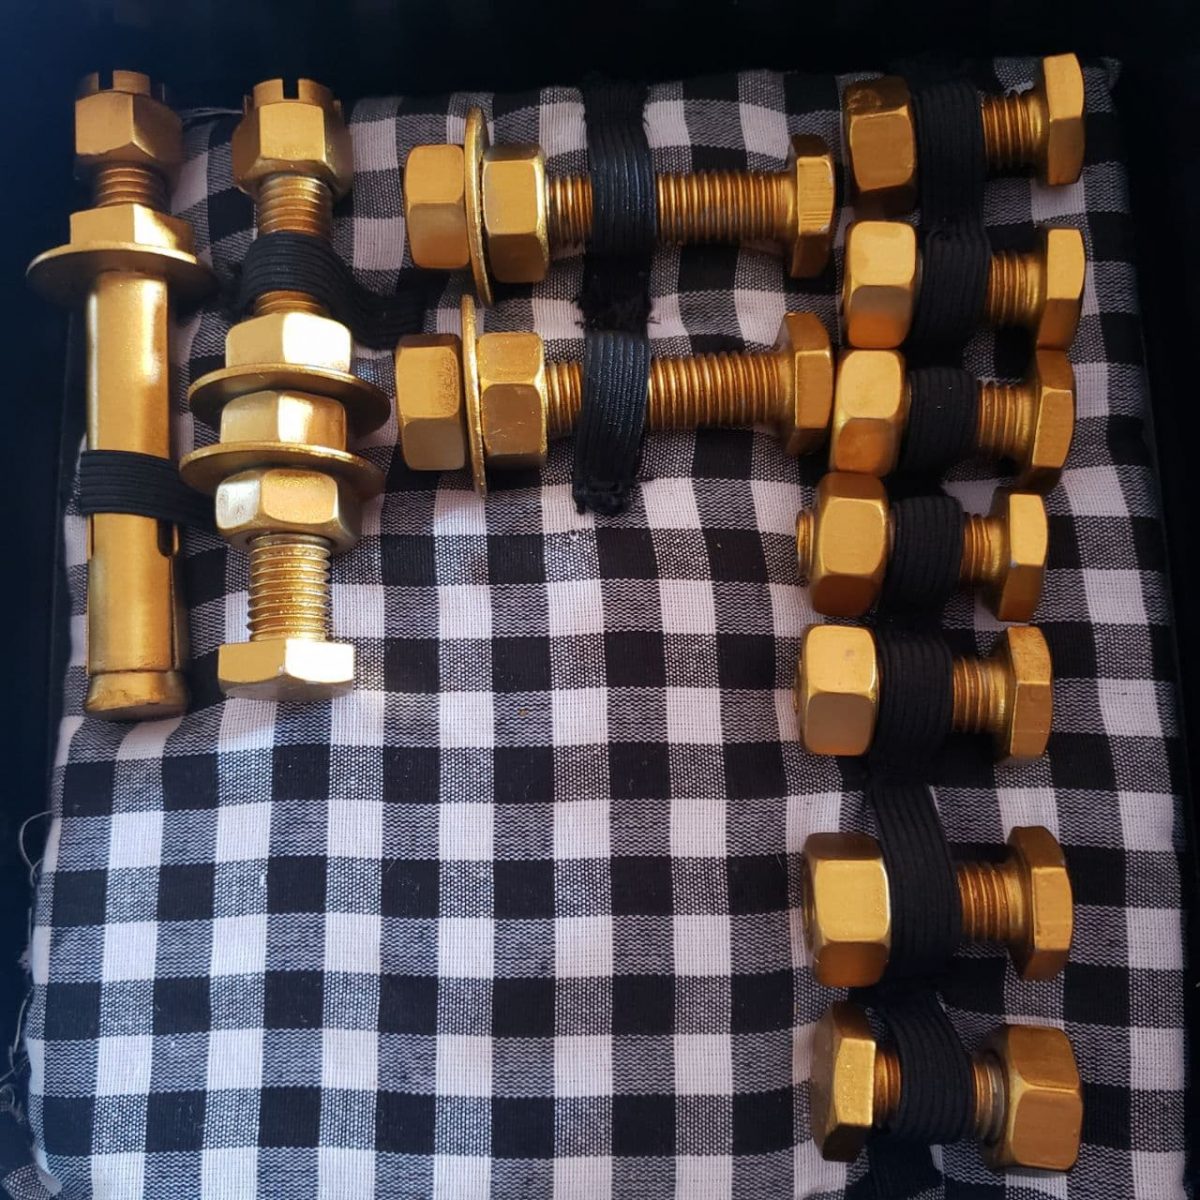
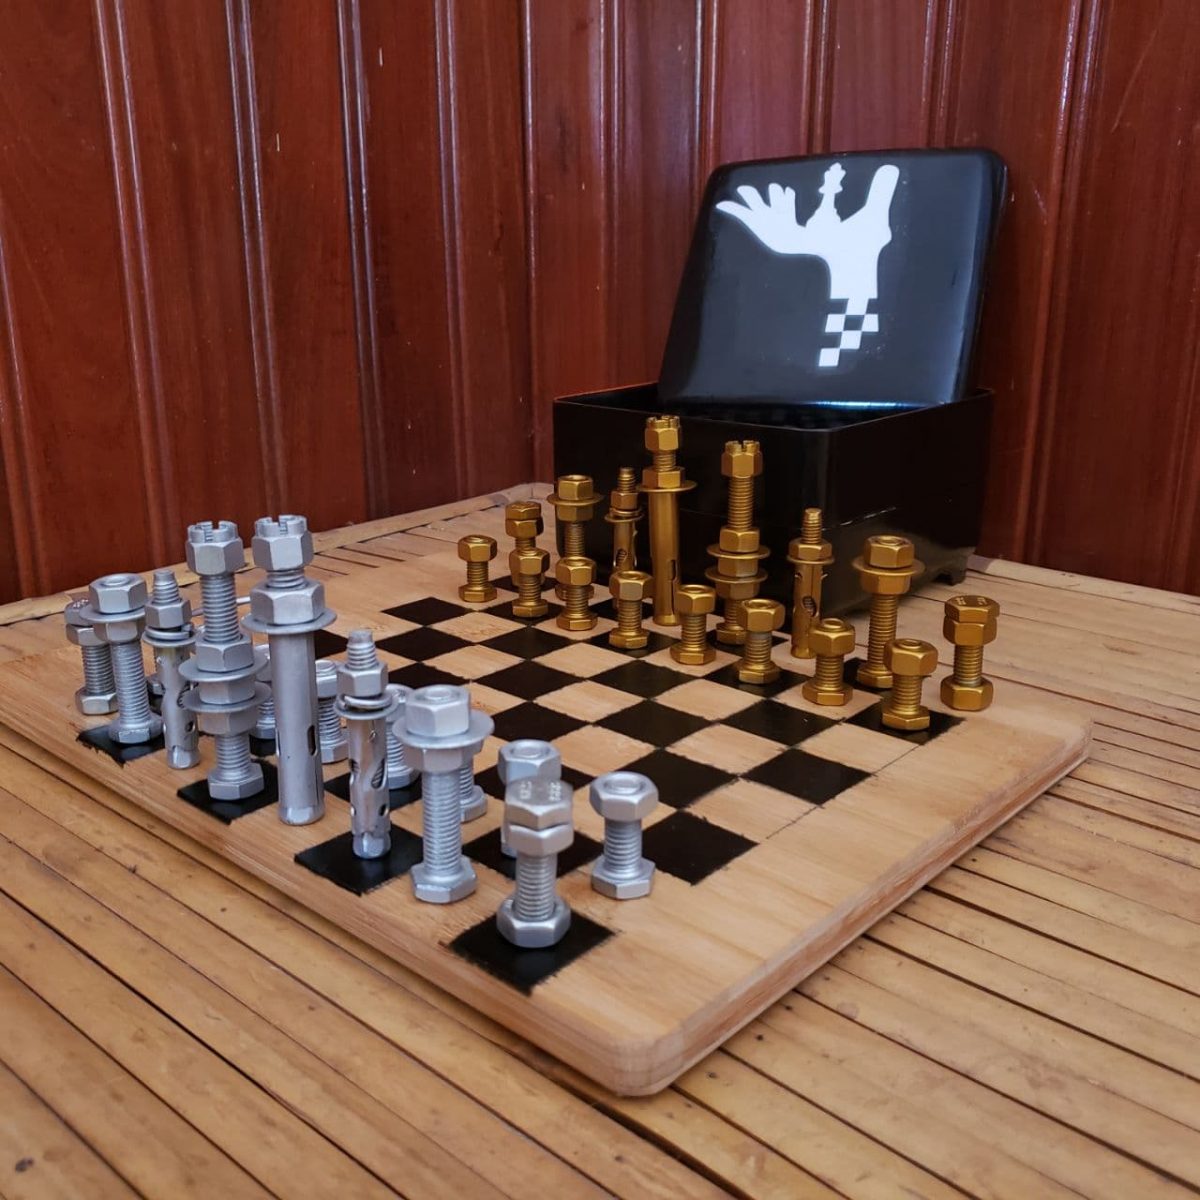
Keith has quite a few passions. I racked my brain for a bit but then the idea came to me. It was obvious. The man is obsessed with chess. Why not make him a chess set? SOLD. Next step was researching some ideas. That’s when I came across the nut and bolt idea. Now, it seemed like a relatively easy thing to do. Pop past a hardware store and pick up all the pieces. EASY PEASY… NOT. It turned out to be a mission to find all the pieces, especially the ones that I originally wanted to get. I think I visited majority of the hardware stores in my little town. Believe me, there are plenty here! None had the pieces I wanted and so I had to improvise. The hardest piece to find, which I’m super chuffed to have eventually found was the crown (castle being its official name). Funnily enough, I contacted my one of my Grade 3 students as her family owns a hardware store and they were the only ones to stock these valuable little pieces. SCORE!
These are just some of the pieces needed
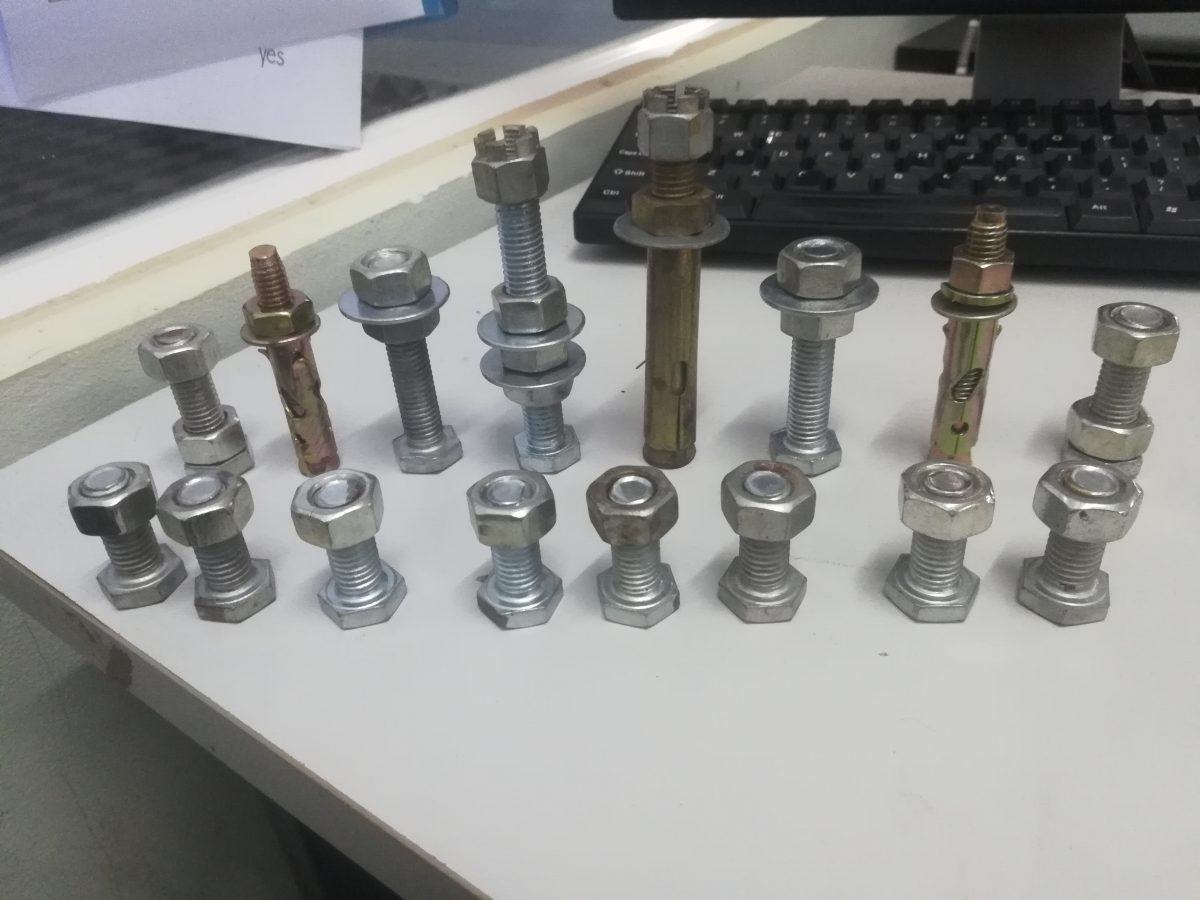
So what next? I initially soaked the nuts and bolts in vinegar to remove the rust on some of the pieces but once cleaned up and dried, I wasn’t happy with how that turned out. It seemed to make the pieces worse. Sooo… off I went to the hardware store again. I found one that I went back to several times to grab an extra nut and bolt here and there. They must have thought I was nuts (haha). Some days asking for 16 bolts and then returning the next day for bigger ones, haha. But I finally got all my pieces, cleaned them up and then it was time to spray…
All ready to be sprayed
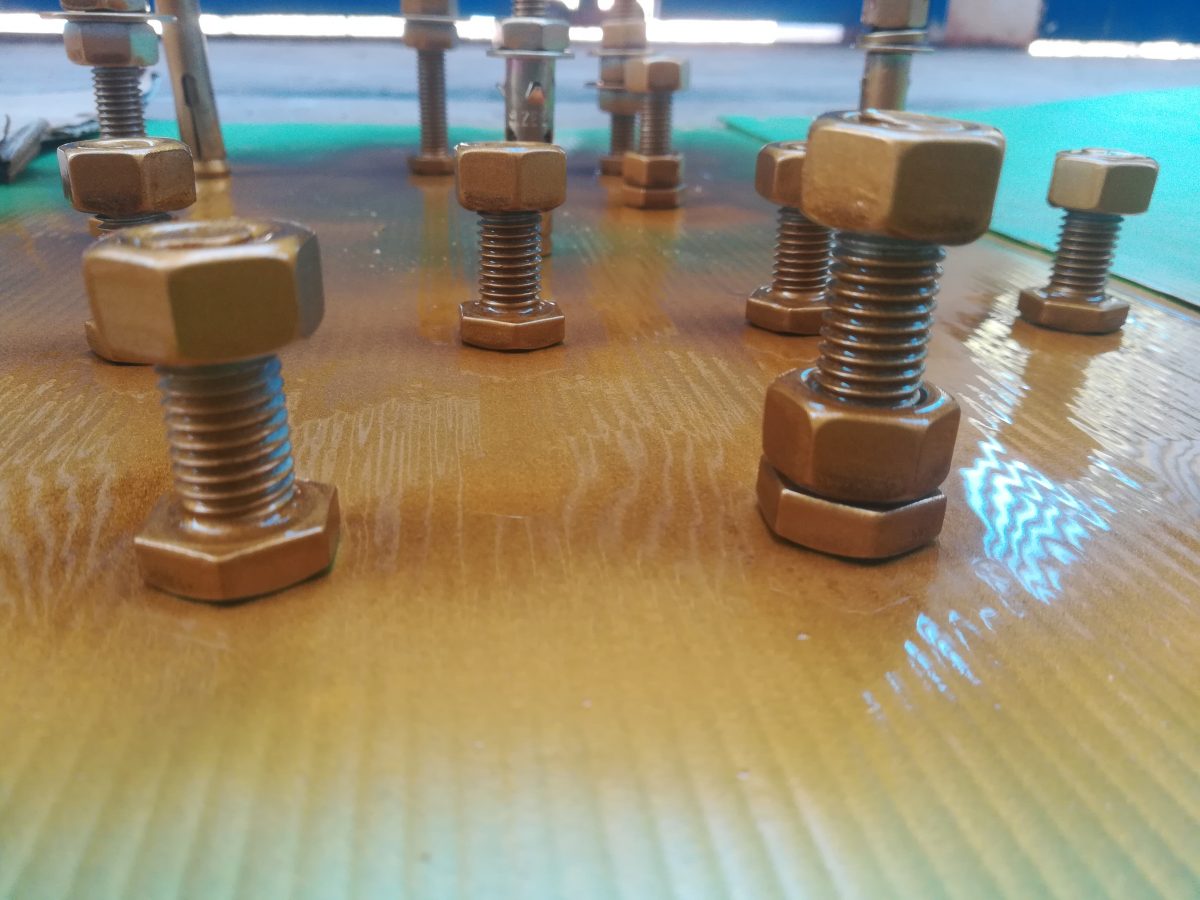
I decided on gold and silver. Thought that would make a great combo. Spray paint is super affordable and it dries so quickly so I was able to spray more than once in a day. Once the pieces were evenly covered, I then sprayed with clear just to seal it all in. I really like how they turned out.
This gold is so pretty.
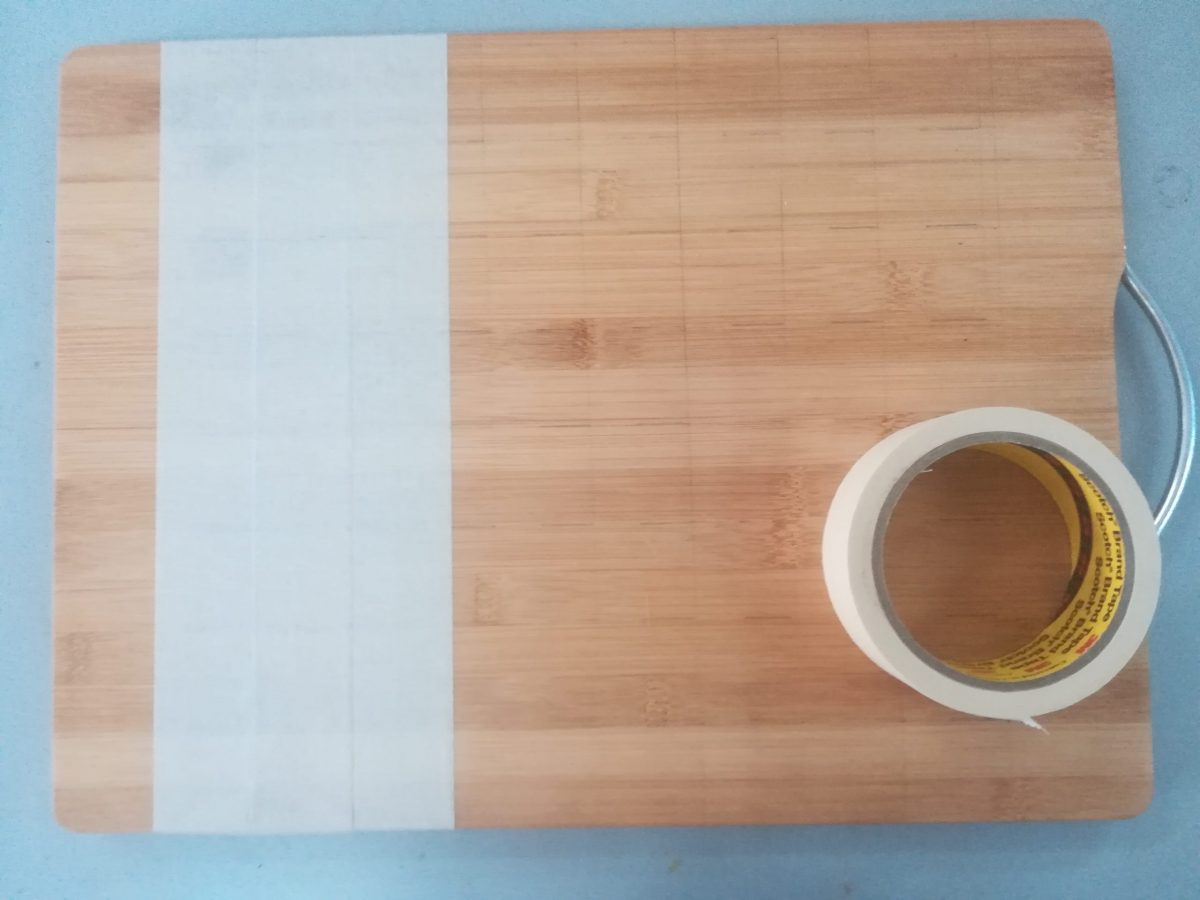
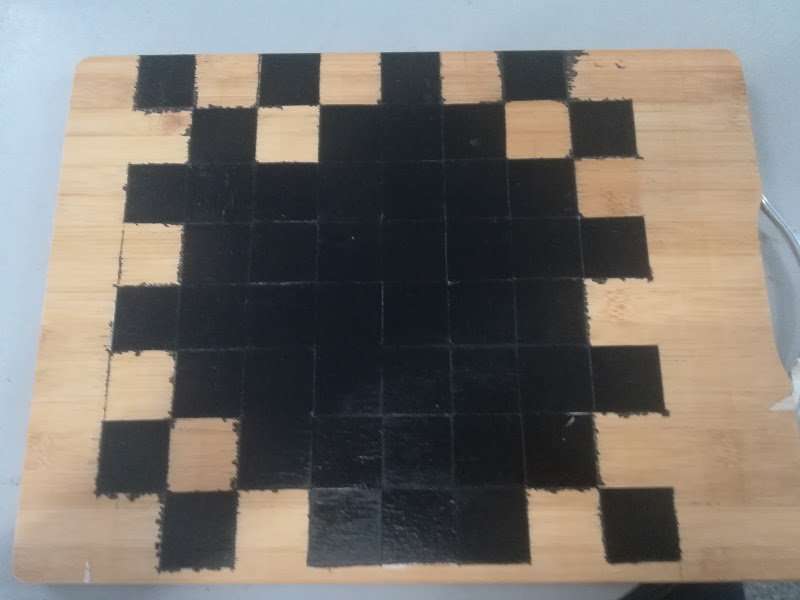
Next up was setting up the board. I wasn’t quite sure what I was going to use but then I realized it needed to be budget friendly and I figured a wooden chopping board would be light and the perfect size. Off to the stores again. I think the size I chose was perfect as the pieces look great all set up and it’s still small enough to travel if needs be.
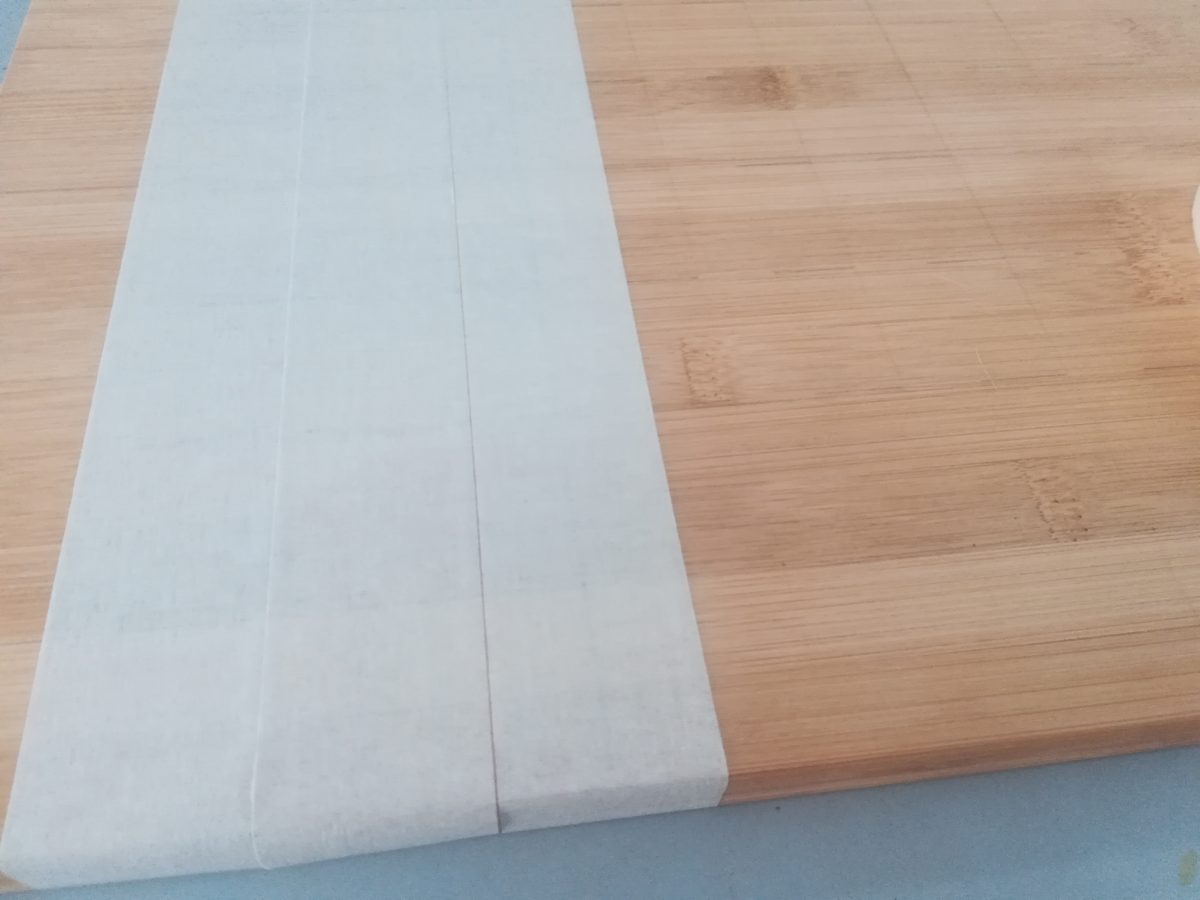
First thing to getting this started was using masking tape to cover the entire board. I was paranoid and used 2 layers, just in case. 🙂
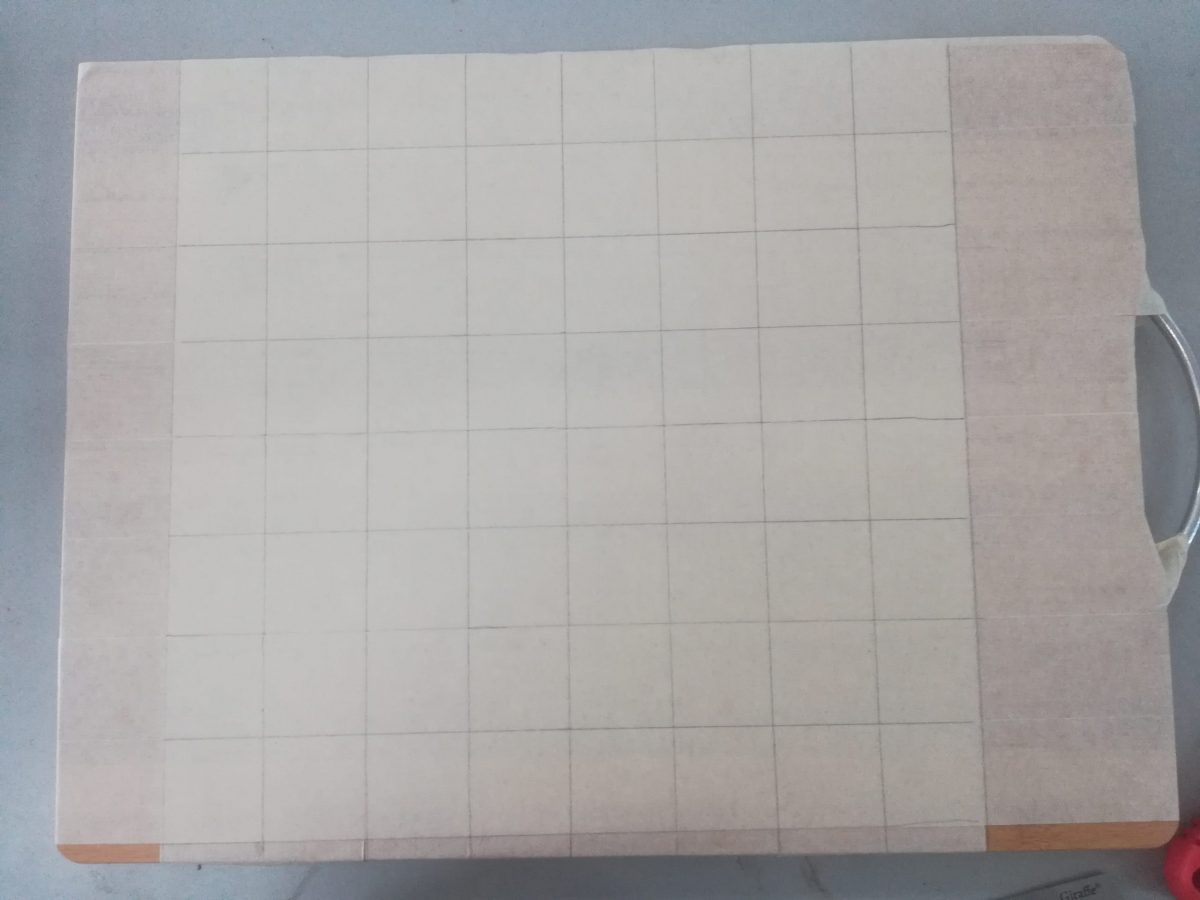
I taped horizontally and vertically.
Then it was time to measure and draw the lines. This takes a bit of time but is totally worth it. It’s also quite relaxing, being completely zoned into something.
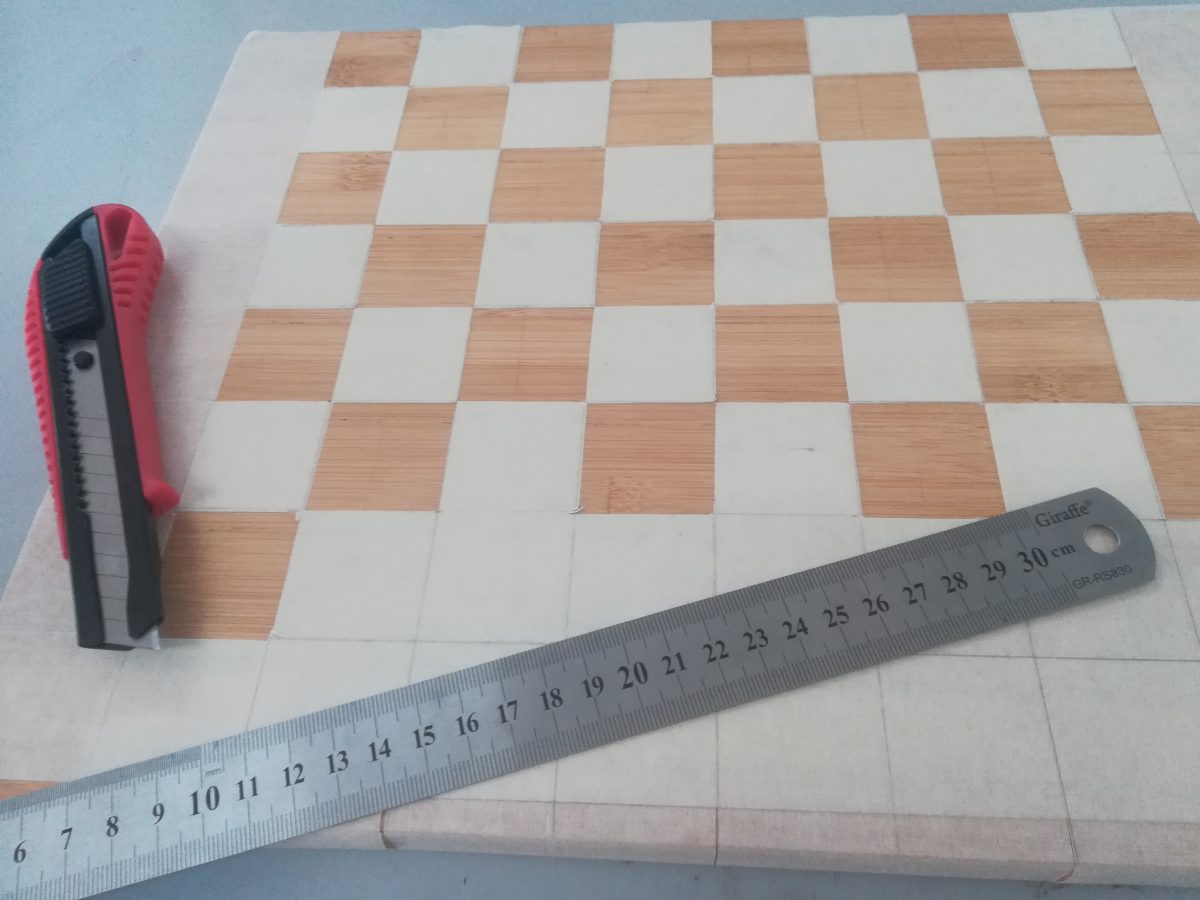
Once that is complete, you can then begin slicing the blocks out. I used a Stanley blade for this and surprisingly, it didn’t take too long to do.
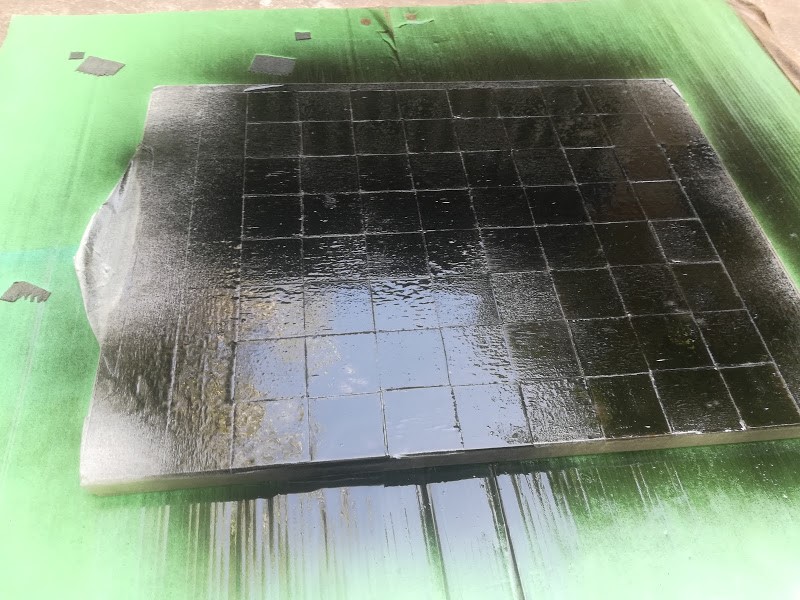
Now it’s time to spray the board. I think I may have sprayed too much on mine (I blame my excitement at wanting to see it all finished) as it did leak through the tape a bit, however, I actually like the effect it gave. It certainly made it a little grungy. Quite apt.
Remember don’t over spray. I may have been a bit over eager and sprayed too much at once, hence my paint lurking in parts it shouldn’t have been.
Let the paint dry and possibly add a 2nd coat. I certainly did. When you’re sure it’s dry, you can start to peel off the remaining tape. It was quite fun doing this although as I mentioned before, I was a tad disappointed at first with how the paint had crept in. Honestly, I did sand it down a bit, especially on areas, which really needed it. However, I am very happy with the final result. It’s great that it’s not 100% perfect because firstly, it is homemade and secondly, I don’t spray paint and the imperfections make it real. 🙂 AWESOME!
What next?
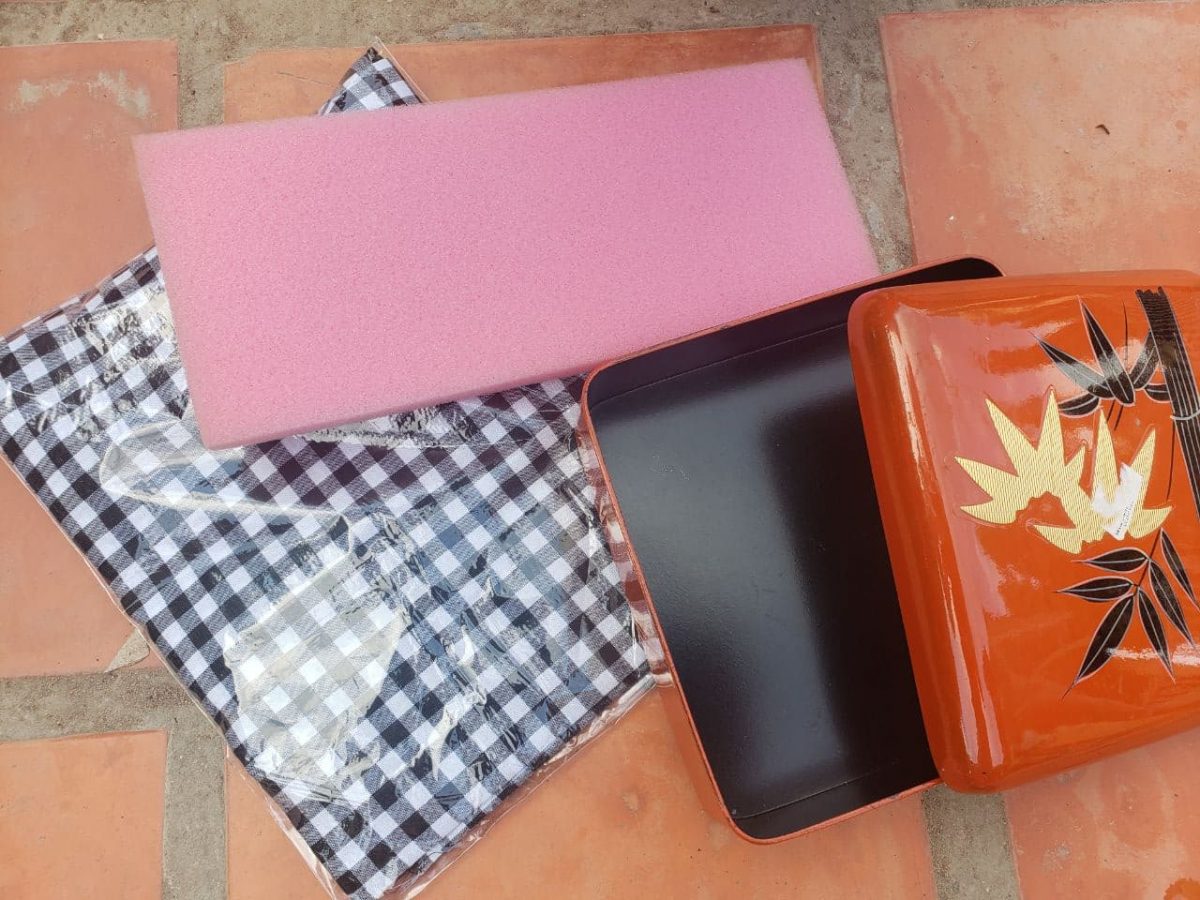
Now I wasn’t planning on making a storage box for the pieces as I had intended it to be something that is always ready to play in our house. However, Keith does love playing chess and might want to take it somewhere so how could he transport all these pieces. Brainstorm alert…
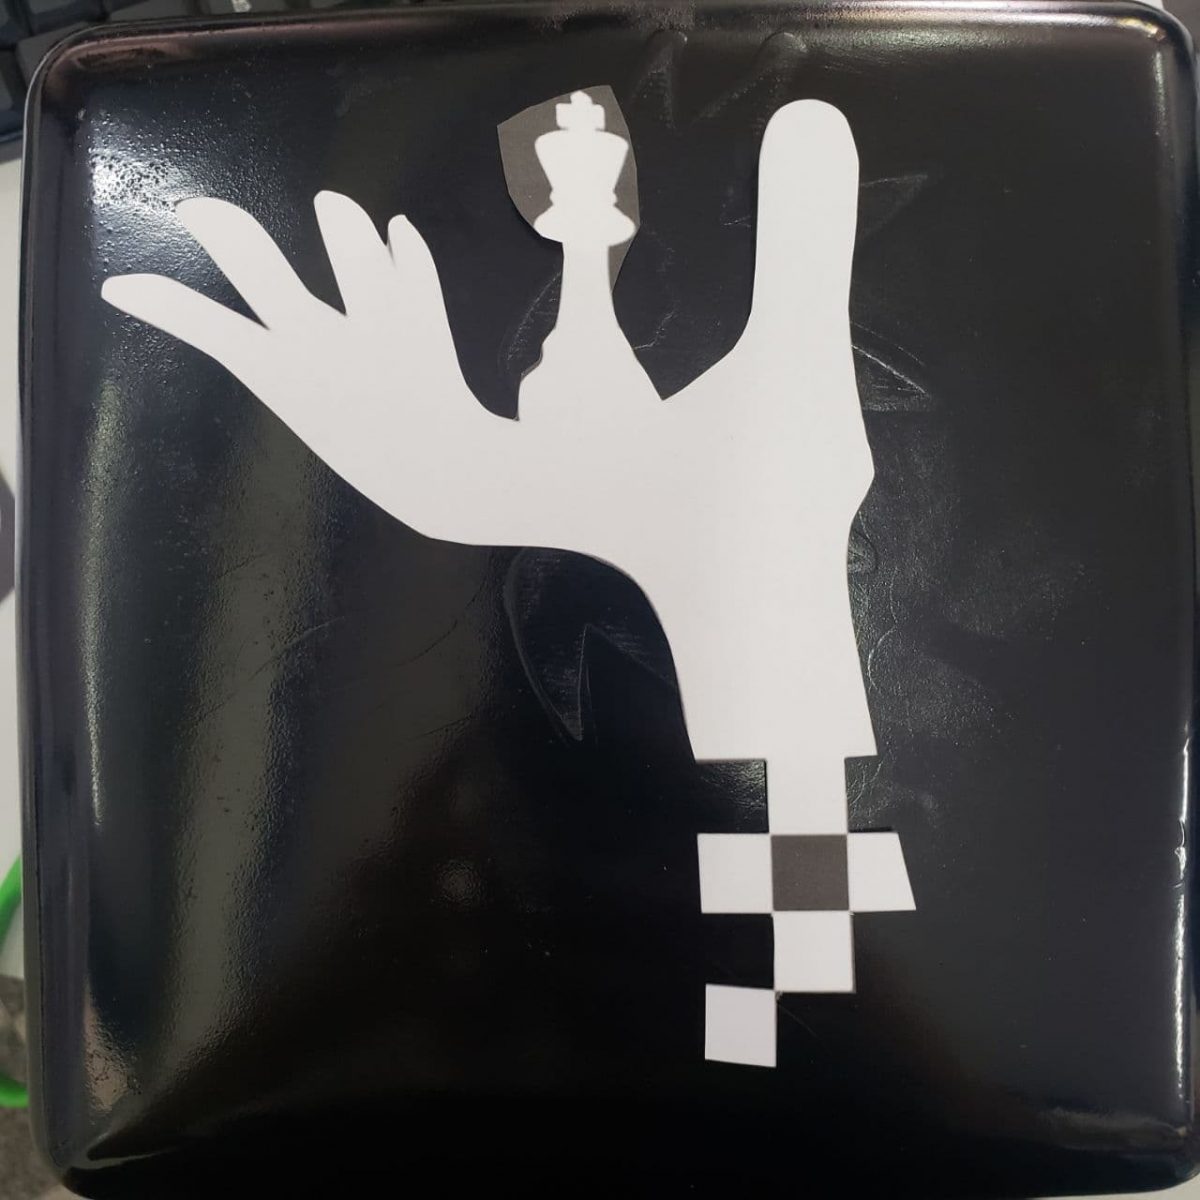
Keith had designed a chess logo ages ago. It’s a great looking logo and I suddenly remembered he had that, which I thought would be the perfect cover for his storage box. So off I went to Sakura, one of the coolest stores in town selling second hand goodies from Japan. I have found gold in this store over the years. I searched through their massive collection of boxes and eventually found the ideal one. I may have looked like a weirdo sizing the box with my bolts, but I’m ok with that.
I’d also decided on sewing a cushion to house the pieces, safely tucked in with elastic. I was looking for fabric that may have a chess pattern. It wasn’t until the shop owner suggested I use a Kroma, which is the traditional Khmer scarf, when I realised that was the obvious choice. How perfect?
Then I removed the leaves from the top of the box, sprayed it black and started sewing my cushions. Now I think my Mom would be rather proud because sewing is not my strong suit. Or rather I haven’t had a desire to perfect those skills. My Gran on the other hand is incredible with sewing anything and everything. Don’t get me started on her knitting. She always took care of my missing buttons and then Keith took over. He is excellent when it comes to fixing holes in clothes. So yeah, it was rather surprising that I decided to sew. I am rather proud of results. Not too shabby for a beginner. The elastic serves its purpose and we had an original housing for all the pieces.
The chess set was nearly complete. The last stage was sizing the logo and then placing it on. I used my DIY modge podge to attach the logo and am absolutely thrilled with the final results.
Sizing the logo. This is Keith’s original logo. It’s so unique.
I worked on his gift for about 2 weeks, which wasn’t too bad considering I had to be very sneaky and do it in between work. I am really happy with the end result and it was totally worth all the effort when I got to see Keith’s reaction. It was priceless.
Happy little chappy
I hope you had a wonderful Christmas wherever you were and that you have a fantastic New Year.
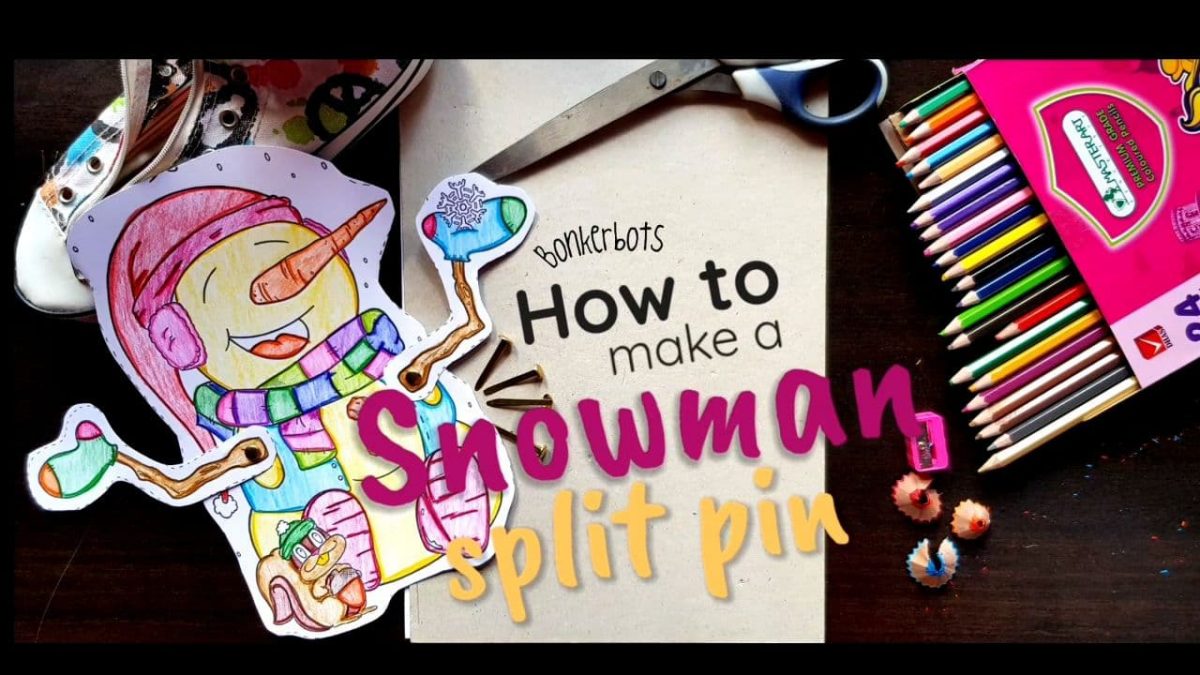
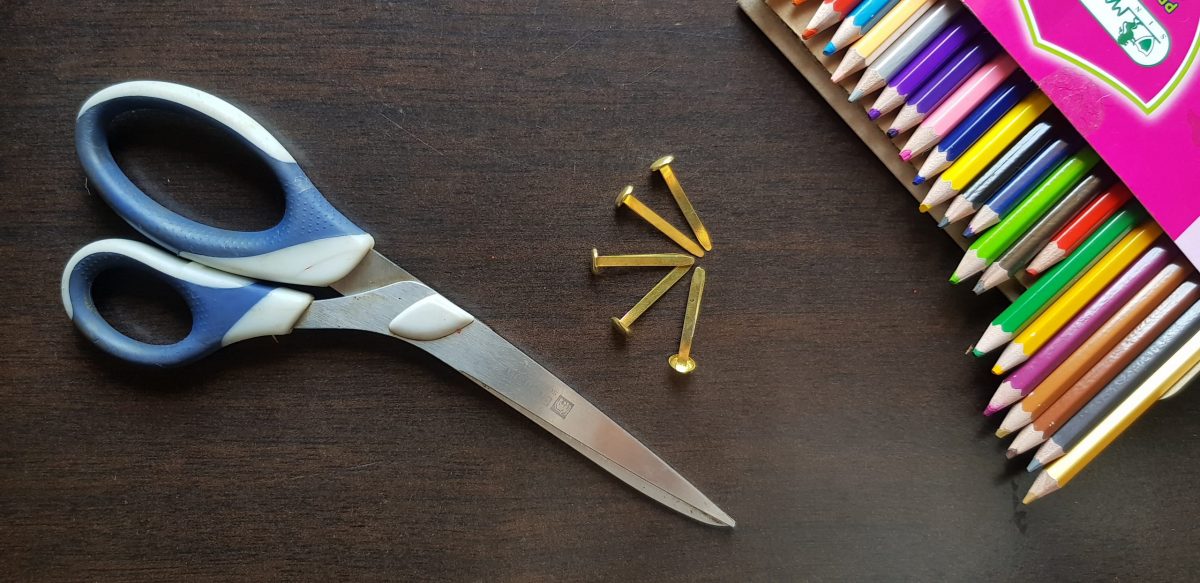
It’s mid November and we’re all searching for exciting Christmas crafts to do with our students. One of my all time favorites would have to be some sort of split pin craft. Many people don’t quite know what I’m talking about when I mention the word split pin but as soon as you describe it to them, they remember them from their childhood. You know, the little pin that lets your creation move its arms or legs etc. I think most folks are also confused as to where to buy these delightful little pins but I’m pretty sure that most bookstores stock them, they’re generally in little boxes hidden in a corner somewhere and an added bonus is that they’re dirt cheap.
I am rather surprised that you don’t find too many split pin templates online. I thoroughly enjoy making them and my kiddies all do too. They love showing you how their little creature is able to move :). Today’s post is going to take you through how to make a split pin craft and then also walk you through our split pin pack. This pack is one of our first products we created when we set up Bonkerbots, or rather K and L as seen in the pics. That was our original name and logo. Cute right? I think this product is a classic and it’s always fun when Christmas time rolls round and I know I can whip these little guys out.
Ok let’s get started…
What you’ll need?
card stock / cardboard (thicker paper than regular)
coloring pencils
scissors
split pins
That’s it. That’s all you need.
Simply print your template out onto card stock. I highly recommend this to ensure longevity with the end result.
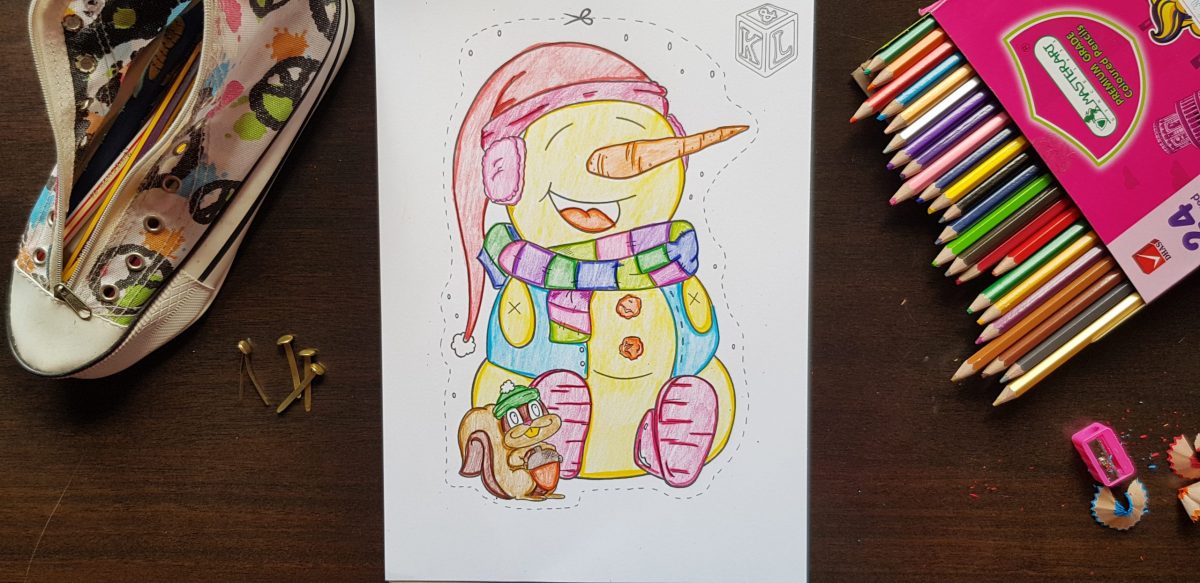
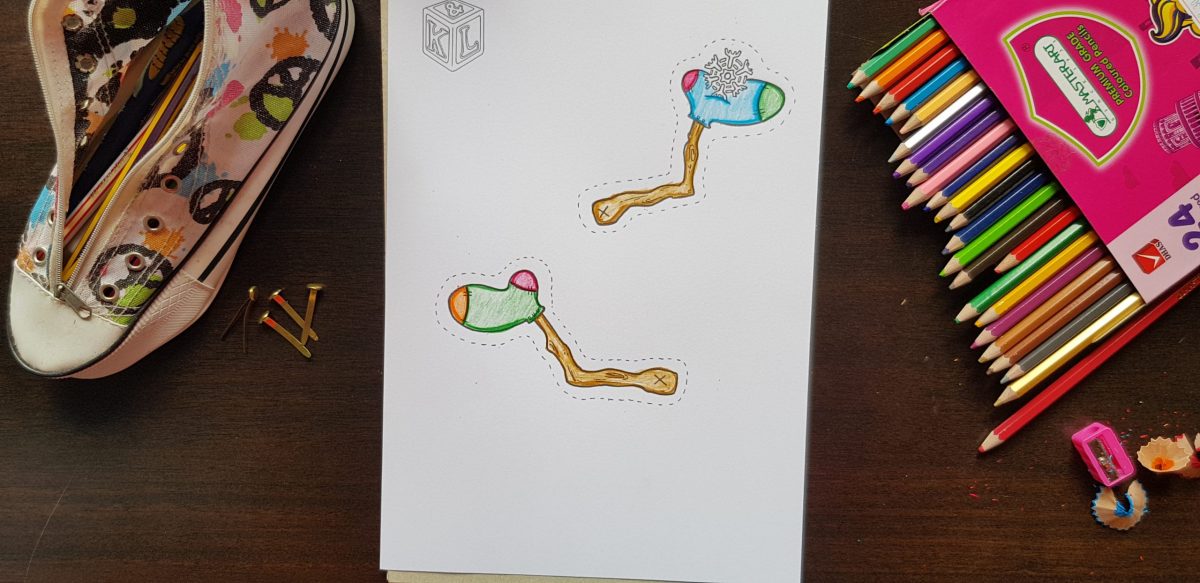
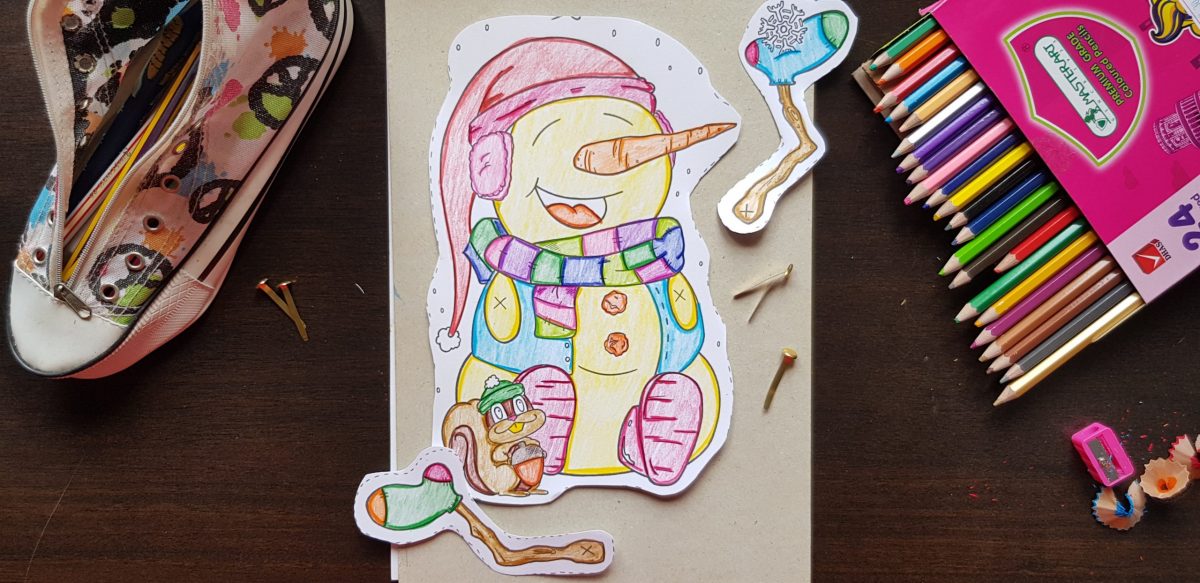
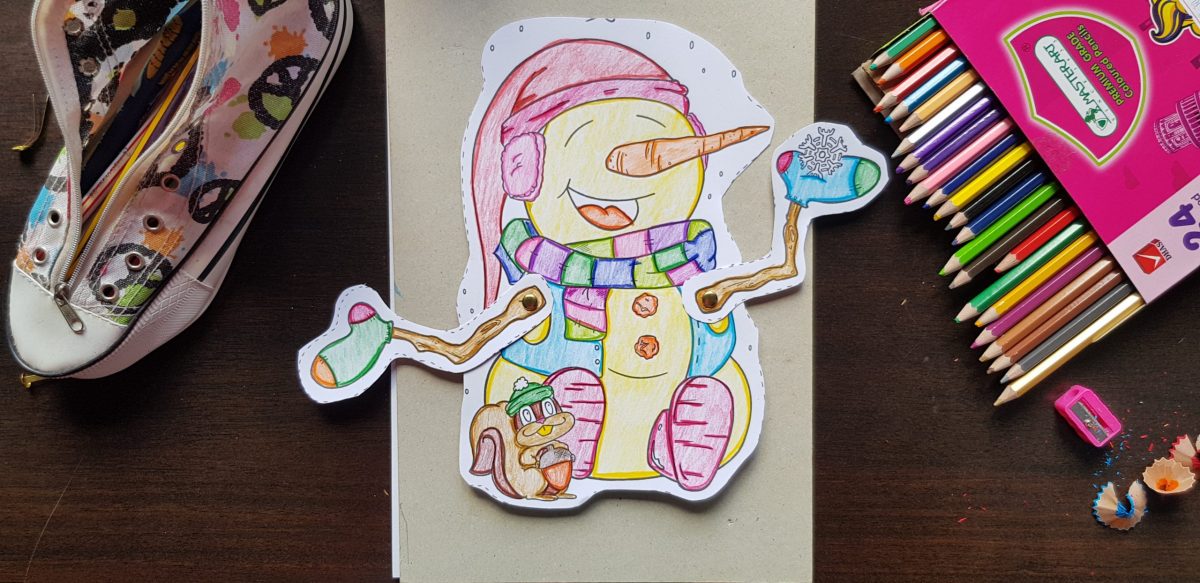
Step 1
Color your template in. I decided on the Snowman, although it was difficult to decide. I have colored in versions of each and will let my students choose which one they would like ahead of time. This builds up the excitement too.
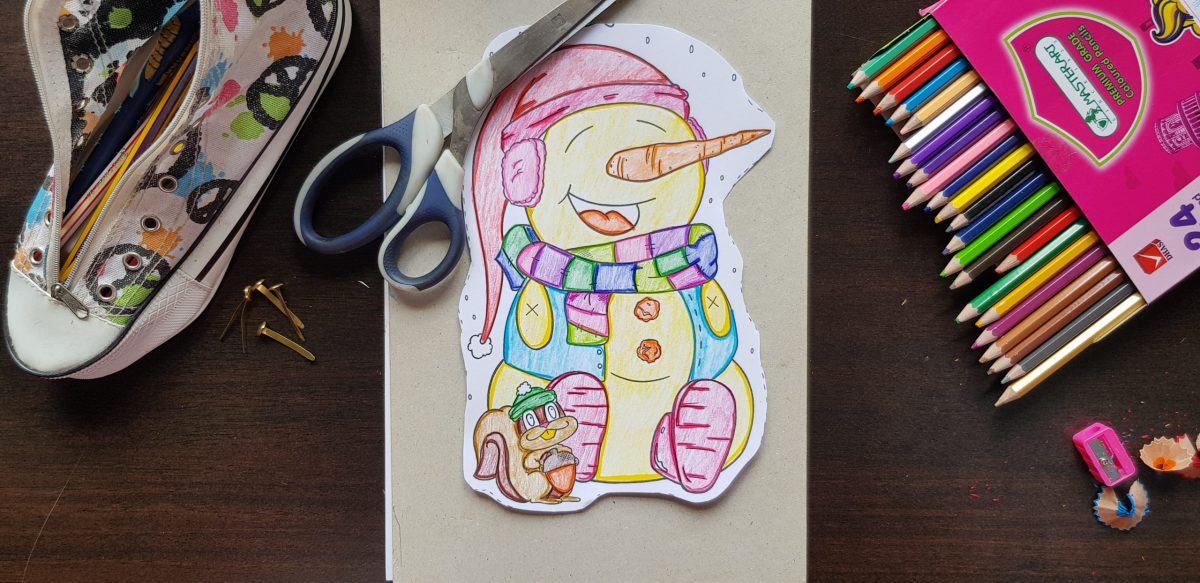
Step 2
Cut your snowman out using the guidelines.
Step 3
Poke holes into the x’s. We used the tip of our scissors to help with this.
Step 4
Attach the arms using the split pins.
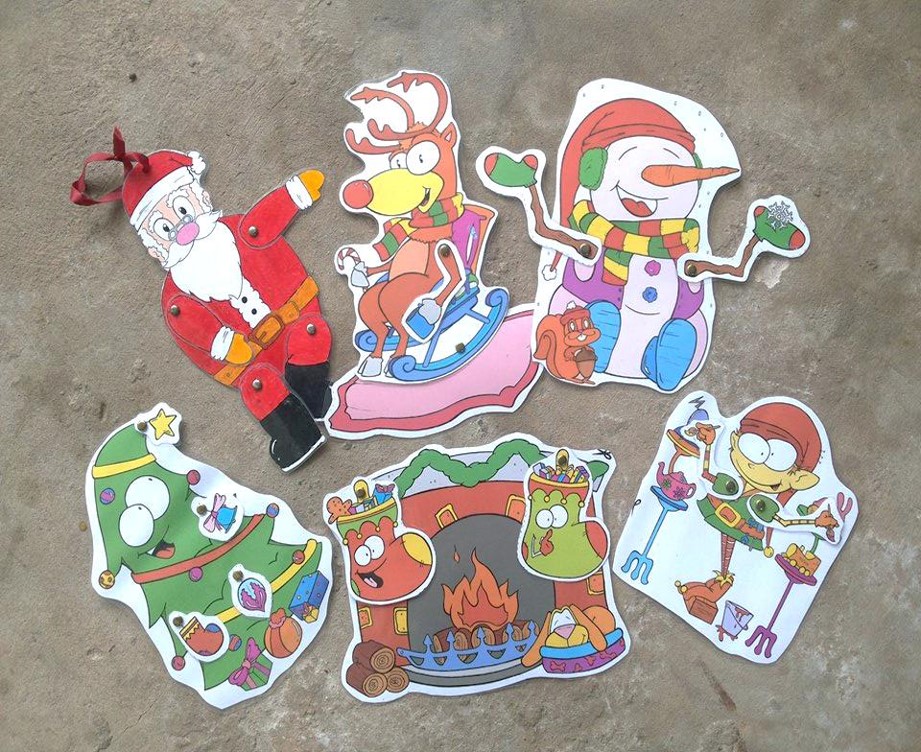
What’s included in the Christmas split pin pack?
Christmas tree
Santa Claus
Fireplace
Elf
Snowman
Reindeer
Each Christmas character requires 2 pieces of card stock. Don’t you think they look adorable? They all have such personalities. 🙂 Click on the link below to grab your own copy.
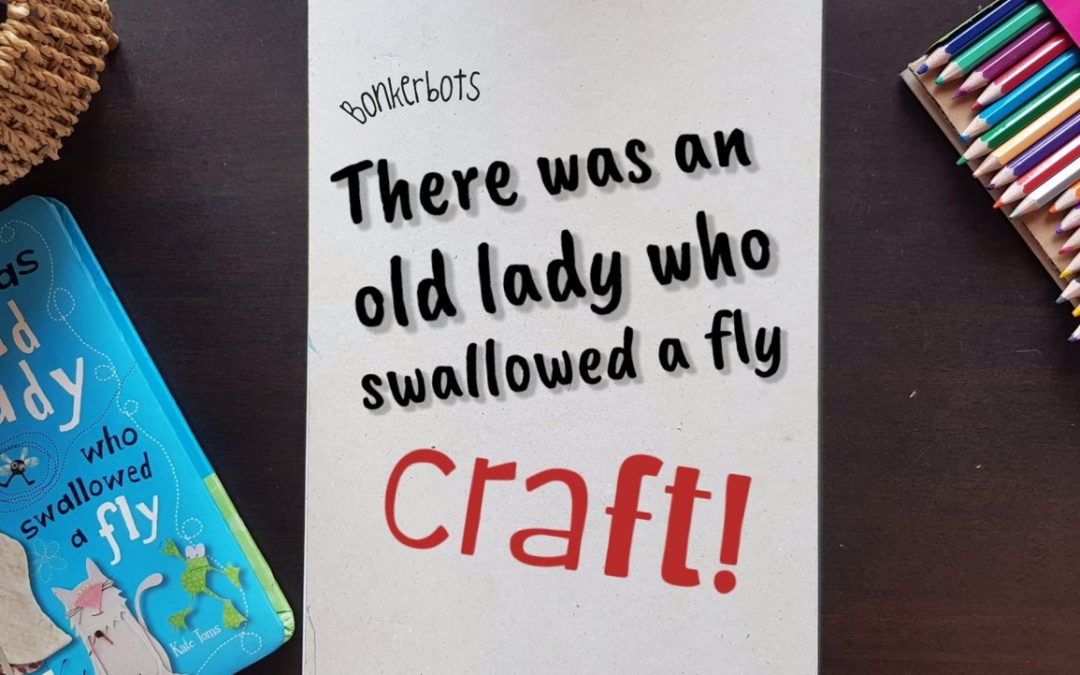
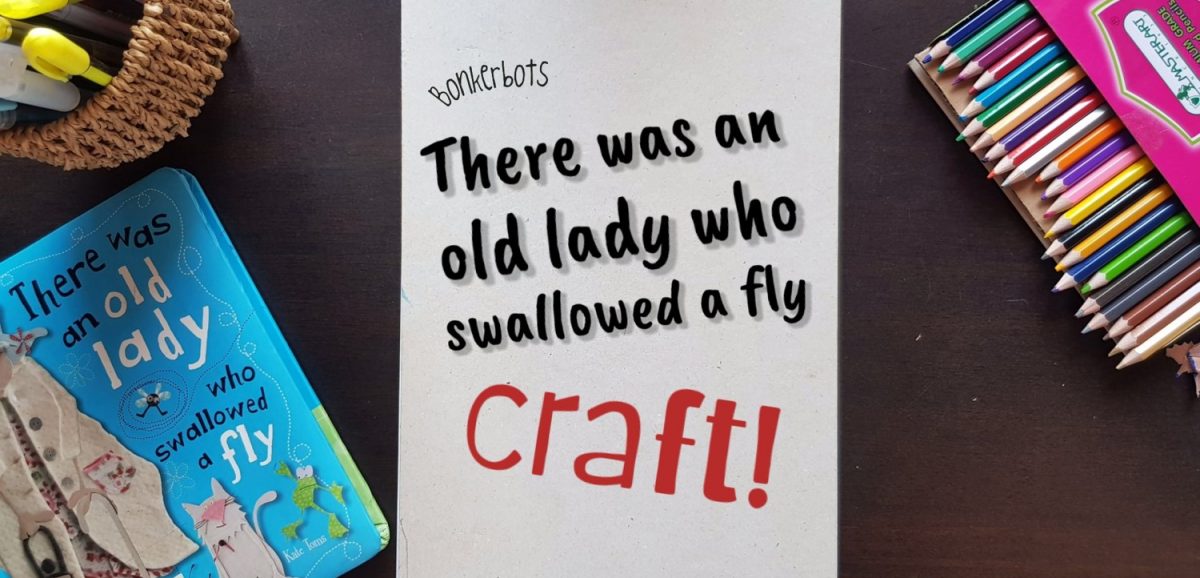
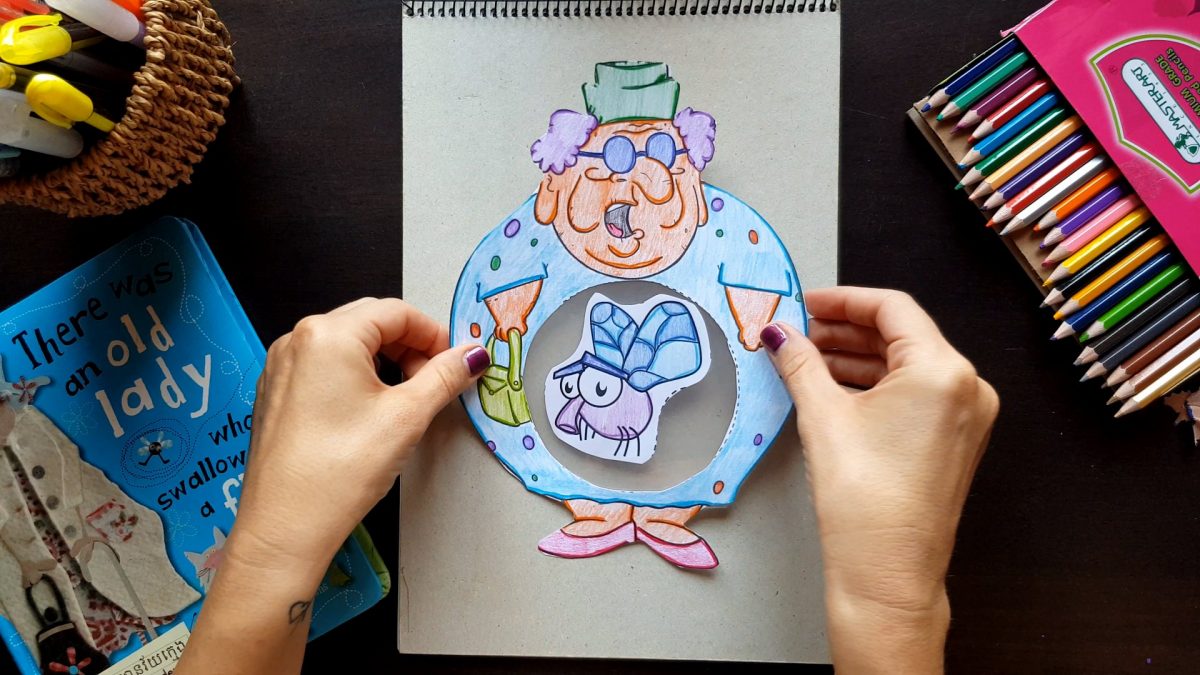
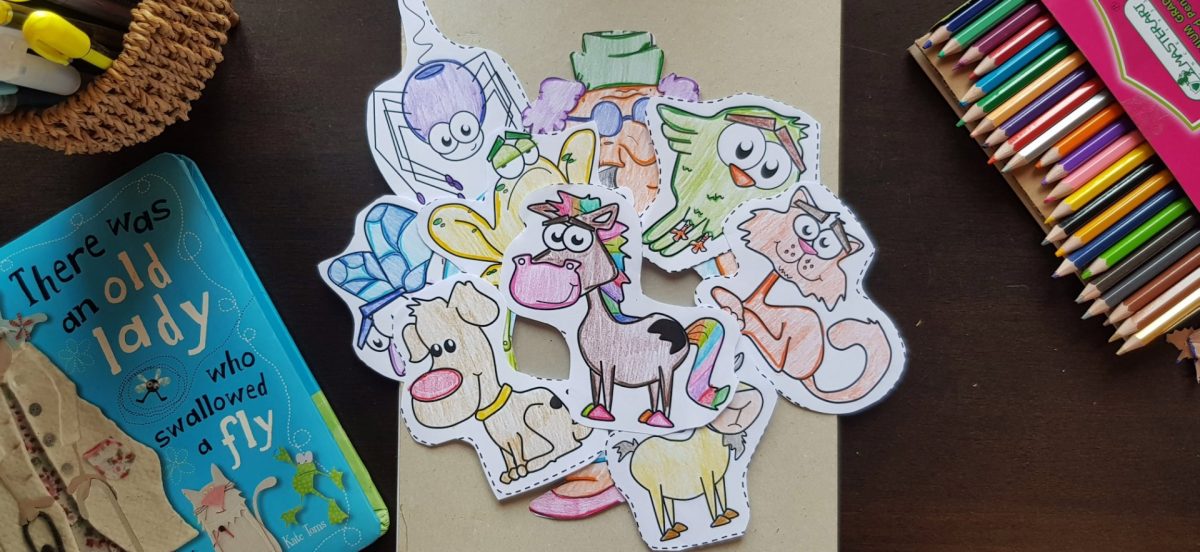
Oh my goodness! This little old lady who swallowed a fly craft has to be one of my favorite crafts that Keith has made so far. I remember the making of it. I had been searching for a copy of the book for ages, as it’s perfect for teaching sequencing and it’s such a bizarre little story…so when I finally tracked one down, I was beyond thrilled. Such a nerd.
There I was searching through Pinterest, looking for an activity but not finding exactly what I was looking for. So what does a teacher, who happens to know an artist do… get him to create your idea! haha! I really do love Keith’s imagination. His work is always unique and all his drawings have such character, like a proper back story. 🙂
Needless to say, the first time I whipped her out to my little Kindergartners, they were super excited and eager to take their own old lady home. It also got them retelling the story with confidence.
Craft = success!
They were able to cut theirs independently and just needed some assistance with sticking the plastic bag (zip log bag). We were able to buy a big pack of these for next to nothing, and it’s a handy thing to have in the office because they super versatile.
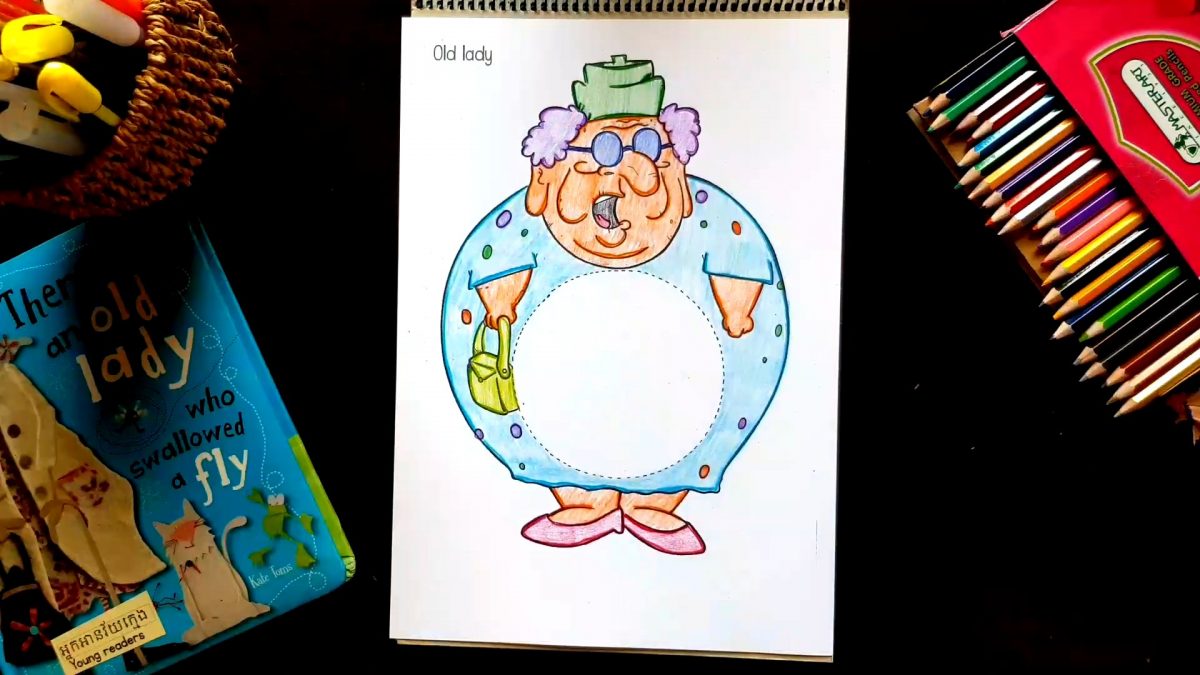
Step 1
Color in the template. It’s always fun seeing how the kiddies bring theirs alive. I highly recommend printing this craft on thicker paper, AKA card stock / card board. It’s more durable, especially since kiddies can be rather rough with their work.
Step 2
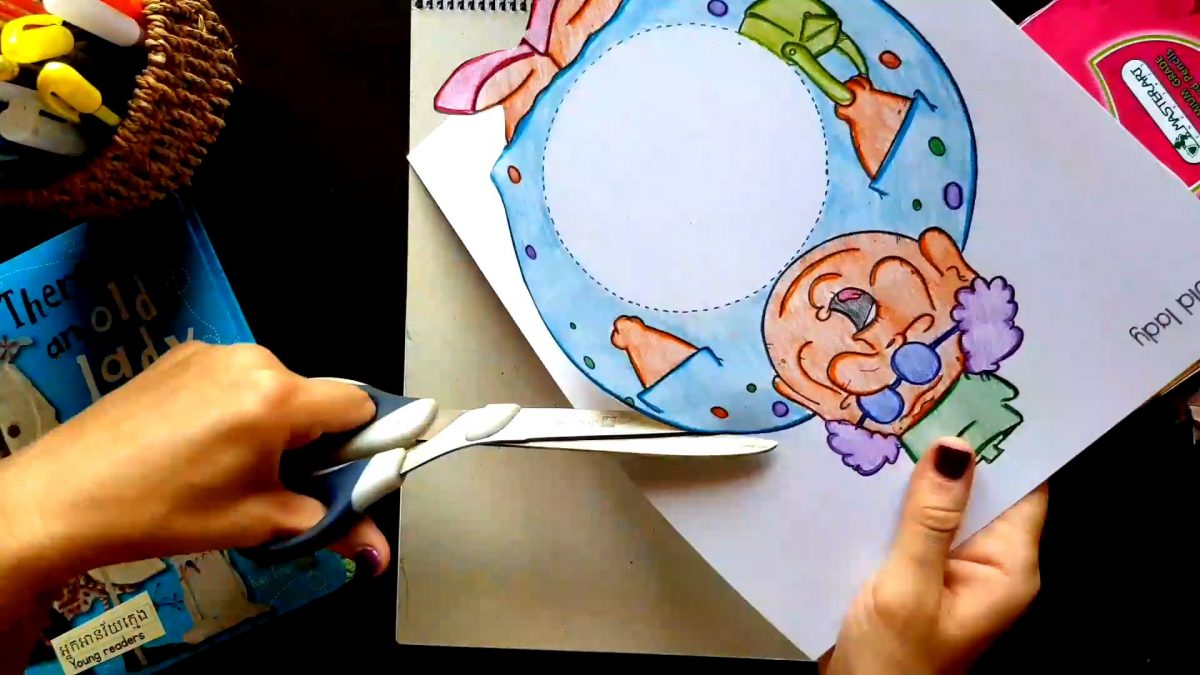
Cut the pictures out using the guidelines.
Step 3
Cut the old lady’s inner circle.
Step 4
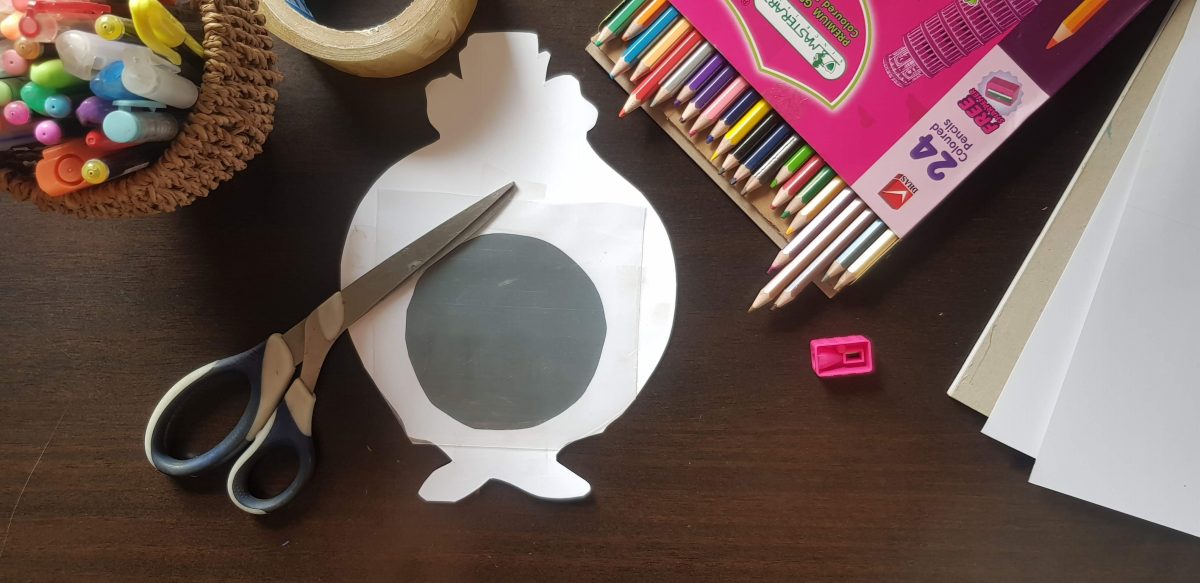
Attach the plastic bag to the back of the old lady using scotch tape. Remember to keep top part open to insert animals and snip off any bits of plastic that are hanging over the edges.
Step 5
Let the kiddies practice their story telling skills and feed the old lady some animals.
I hope that your little ones will have as much fun as we did in creating the old lady who swallowed a fly.